Imagine a smart home where all devices and not just your computer and smartphone are connected to the Internet so that they can take your commands and send you information. Wouldn’t it be great if you woke up and the coffee maker started brewing a fresh cup of coffee for you, or the lights just knew when to turn on and off without you reaching for the switches every time? Welcome to the world of the Internet Of Things, also known as IoT, which forms an essential part of smart home automation.
When I recently moved to a new house, I jumped at the iadea of turning it into a smart home where I could communicate with my devices and appliances. I had heard a lot about Amazon Echo Dot and decided to get one to simplify and automate things.
In this beginner’s guide, I will take through all that I have learned during the process of building my own smart home using Amazon Alexa and other smart devices. Don’t forget to check the FAQ section towards the end of the article to get the inside scoop on all things related to smart home automation. Let’s get started.
1. Buying An Amazon Echo
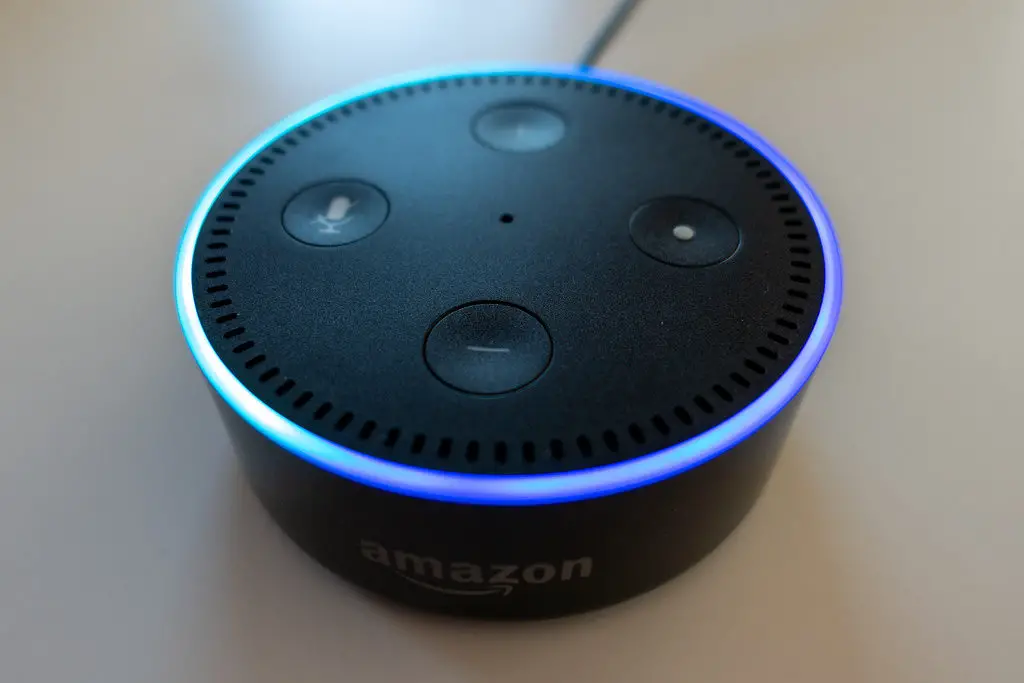
 First things first. To start building a smart home, you first need to get an Amazon Echo, which will form the base for all automated systems. This is a voice-controlled assistant just like Google’s Assistant and Apple’s Siri.
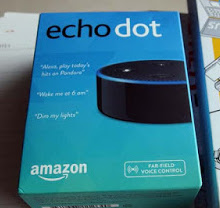
I ask Alexa to turn on the lights, order a pizza for me, pay my bills, or even answer my calls. Cool, isn’t it? I had done my homework on this and was decided to get an Amazon Echo Dot because:
• Installing an Amazon Echo is easier and it can be done quickly
• It can be used as a smart home hub connected to every smart appliance (Alexa Compatible)
• Echo can be set up at any location where you need Alexa
• It is one of the smallest and the most affordable smart home controllers available
• Alexa has over 10,000 skills and you can add more third-party skills as per your preference
• The mobile apps for Echo products are compatible with Android and Apple platforms
2. Finalizing The Spot To Place The Echo
Next important step is to finalize a spot or location to place the Echo. It can be put anywhere in the house as long as it falls within the Wi-Fi range and has a power outlet connected to it. The rule of the thumb is to decide which location of the house you are going to use Alexa more often.
So, whether you wish have your Echo read out recipes to you at the kitchen or tell a bedtime story to the little ones in the kid’s room, the choice is yours. I personally like keeping it in my bedroom so that Alexa can wake me up in the morning and read out my to-do-list.
3. Buy Your Smart Home Devices
After you have set the base for your smart home automation, it is time to start looking for smart devices that can be connected to the Echo. If you look online, you will find a plethora of gadgets that work with Echo. Here are some of my favorites that I found incredibly useful while building my smart home:
Smart lighting
Smart lighting is one of the best applications you can use with the Echo. I use smart bulbs designed to save energy, go dim, or increase in intensity by responding to commands. I just replaced the standard bulbs with smart bulbs offered by different brands.
Before buying a smart bulb, make sure the brand is compatible with your smart hub (Echo in this case). If you are using another smart assistant, you may want to check for that too. Some of the smart lighting brands that work with Alexa are Philips Hue and Lifx Mini Wi-Fi Smart Bulb.
Smart heating
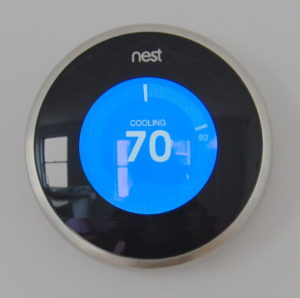 Smart heating and cooling appliances were the next big thing on my list. I chose the Nest Learning Thermostat for its bright and user-friendly interface. What I like best about this product is that it gives a hands-off approach without having to program anything. What’s more? I can turn the heating on, off, or adjust the temperature in any room by giving commands to Alexa.
Hive Active Heating is another amazing smart home device that is compatible with Amazon Echo. You can control the device using the smartphone app to come home to a warm and inviting home every time. It also sends a reminder to turn off the heating if you leave home without switching it off. The best part is that it works with Alexa so you can turn off heating with voice command.
Wireless security cameras
Wireless security cameras are smart devices that can be used to monitor babysitter, pets, or simply to keep a check at home to ensure everything is fine while you are away. I use Arlo to watch my pets when I am away from home. It is 100% wireless, weather resistant, plus it works with Amazon Alexa.
Another awesome smart home security product worth considering is Ring Video Doorbell that sends a notification as soon as someone steps into your property. It is also compatible with Alexa so get informed about the visitor even if you are in a different corner of the house.
Smart plugs
Smart plugs are perhaps the most basic smart devices you can get for your futuristic home. I have several smart plugs around the house to smarten-up otherwise ordinary devices and appliances such as the lamp, washing machine, and fans.
So, even if I am in the bedroom, I can ask Alexa to start the washing machine if it’s connected to a smart plug. Some of the most recommended brands are TP-Link, WeMo, and Hive Plug.
Is It Necessary To Have All Products Working On The Same Platform?
This is a common question most buyers face when buying smart products for their home. A few years ago, I would have said yes because the technology was in its nascent stage. However, Amazon’s Alexa has highly evolved in the last few years and now it works with a wide range of brands and devices. That’s one of the biggest perks of using Alexa.
To simplify things, try to use one brand for a bunch of devices, for example, you can Hive products for lighting and heating needs so that gives me the freedom to control multiple devices with one app.
When in doubt, ask Alexa to give you a list of “working with Alexa” devices to help you choose from different price and quality brackets. The products mentioned above are already tried and tested so they can be used with confidence.
4. Sync Smart Devices with Alexa
After you have installed the gadgets, it is time to sync them with Alexa so that you can control the devices by giving voice commands to the assistant. To start the syncing process you will have to say this:
“Alexa, discover new devices”
Alexa will scan new recognizable devices in the radar for 10 seconds and add them to Alexa app. You can then start controlling your smart devices with Alexa. In some cases, you may have to do this manually by adding a special skill to Alexa app. To enable skills, go to Smart Home Skills’ in Alexa app and then search for the skill you want to enable such as Nest, Lutron, and Philips.
5. Rename Gadgets to Avoid Confusion
When Alexa app adds skills by scanning devices, it picks defaults names, which may be the same for multiple gadgets or the same products from different brands. So, when you give voice commands to Alexa to switch on the light, she may be confused about which one you are referring to. To avoid this chaos, go to the Alexa app and rename the different devices, even the random ones.
6. Create Different Groups and Scenes
This is one of my favorite Alexa features. Groups allow you to club two or more devices under the same name so that you can control them with a single command. For example, I have more than one light in the living room, so I have clubbed them into one group called the living room lights’ and simply say Alexa, switch on the living room lights’ whenever I wish to activate them.
To create a Group, go to Alexa app – then Smart Home Skills – tab on ‘Create Group’.
Scenes help you bring multiple devices into preferred settings at once. This is possible only if the smart devices allow you to import scenes and the specific device apps have the provision to create them.
For example, I use the scene setting feature with Lifx Smart bulbs which allows me to create special color effects for Monday evenings or for special romantic moods.
To activate that setting, I simply say Alexa, turn on Romantic’ and Voila, it sets the ambiance for a dinner date at home.
7. Make changes and tweaks as you go
As I started building my smart home with Alexa, I was a learning curve for me. I would recommend that you start small with a few gadgets, make tweaks and learn from mistakes, just like I did. Once you feel confident about using multiple gadgets using Alexa, start expanding the skills.
A nice trick is to increase Alexa’s vocabulary is to club devices under one Group and give them alternative names. For example, I have two smart bulbs clubbed under kitchen lights group and I have named them separately like “Kitchen light” and “Table light”.
When I say “Alexa, turn on table lights” or just “Alexa, turn on kitchen light ”, both commands work for the two bulbs. As I learned to make small tweaks like these, controlling the smart home became a lot easier and more fun!
Is My Smart Home Automation Complete Now?
No, there’s still more work to do. Next important step to cover to achieve full smart home automation is IFTTT. What is IFTTT in the first place? Let’s discuss this further.
IFTTT (If This, Then That) is a key element that is often referred to as the recipe to cook a perfect smart home automation solution. This free online service allows users to links smart devices with web services with the help of applets’ to achieve amazing home automation results.
IFTTT is just what it means in its expanded form – If This, Then That. For example, if the security camera senses an intruder in the house or a fire alarm detects smoke, the smart bulbs can turn red to alert you.
With IFTTT, I get to explore different options or recipes available to interconnect the devices to create an ultimate home automation experience.
How Can IFTTT Applets Make Life Easier?
When used effectively, the IFTTT Applets can simplify things and help activate multiple tasks with just one command. It goes in the line of “If A happens, then do B”. For example, I use an Applet that says:
“If it’s 18:30 pm on a weekday, turn on my smart heater”
This ensures I come back to a comfortably warm house. You may also configure Applets to trigger multiple actions instead of just one. It follows a sequence and goes about performing the first action, the second and so on. Another example is:
“If it’s 6:00 am on any weekday, start my smart coffee maker, turn on water heating, draw the window blinds”.
As simple as that, and convenient too! When configured correctly, IFTTT will not only enable your smart home system to react with other devices but also with external events. Below I have created a list of 7 interesting ways to use IFTTT Applets to take your smart home environment to a new level.
7 Interesting Ways To Use IFTTT Applets For Smart Home Automation
 1. Get your morning coffee up: It certainly can’t get better than this! All you need is a WeMo smart plug and connect it to IFTTT Applet to tell the coffee maker to brew a fresh cup of steaming hot coffee as soon as you wake up. This is one of my favorite Applet s and it says: “If it’s 6 am on weekdays, turn on the coffee maker”. The device brews coffee automatically, ready for me to sip on it as soon as I rise and shine!
2. Smart bulbs light up automatically at dusk: My Friend has the smart lighting solutions by Philips Hue connected to IFTTT so that the lights turn on automatically when the sun sets. Even if she is not home, the house is not dark and she comes back home to a lighted walkway.
3. Finding your phone is easier than before: If you are like me who often forgets where he kept his phone, WeMo and IFTTT can take care of this situation. When you can’t find your phone, you can configure IFTTT to call your phone when you press the WeMo light longer than usual or ask Alexa to detect the phone’s location.
4. Ask Alexa to make the grocery list: I personally find it cumbersome to create a grocery list and keep forgetting things. So, I use my IFTTT Applet to enable Alexa to create a grocery list for me. Whether I am working, watching TV or having breakfast, I just tell Alexa what to add to the list and email it to me when done.
5. Saves water: If you have a Smart Sprinkler Controller connected with IFTTT Applet, it will tell the system to not water the lawn or plants if the weather forecast says it’s going to rain tomorrow. You don’t have to look up to the sky every time and leave it up to the IFTTT to keep your plants watered on time.
6. Informs you when the laundry is done: This is my another favorite as I hate to babysit my washer. My friend’s Samsung smart washer is connected to IFTTT Applet to let me know when the laundry is done. So, I can do other work and forget about it until I get the notification that the laundry is done.
7. Ensuring all appliances are turned off: I have lost the count of the number of times I have forgotten to switch off appliances and left them on or charging throughout the night. Not anymore! Hunter Douglas PowerView’s goodnight All’ Applet is an amazing tool that ensures that every single device in the house is switched off for the night.
Frequently Ask Questions (FAQs) About Amazon Alexa
What Are Alexa Routines and how to create them?
Routines are one step ahead of Groups and they can add more value to your smart home automation process. The Routines allow certain actions to take place automatically when you say specific trigger phrases. These phrases have to be supported by the third-party apps.
Currently, the Remotes are in their nascent stage, and users might face certain challenges when trying to set them up. You need to be very clear with your phrases so that Alexa can understand the commands clearly.
1. Open the Alexa app
2. Go to the Menu on the right-hand corner and tap on routines’
3. Now, tap on the ’ sign to create a new Routine
4. Choose a phrase or a time to start the new Routine
5. Select actions from categories offered to start a Routine
6. Pick the device on which you wish the Routine to work
How To Activate Skills To Build A Smart Home?
Skills are the main lifeblood that makes Alexa work wonders. These are special applications that are activated by voice commands. They tell Alexa what a new device connected to the hub can do and allows you to control various devices by simply giving commands to Alexa.
After connecting a new smart device to Alexa, you just need to ask Alexa to search for the skill or you may do it manually by adding the skill to your Alexa app on a smartphone. While it is easy to install the skill simply by using voice commands, you will need to enter the account details in the Alexa app.
Steps to activate skills on Alexa app
• Open the Alexa app
• Press the menu on the left-hand corner
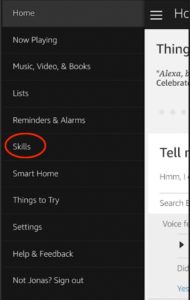
• Choose Skills from the menu
• Open them under the ‘Smart Home’ category’, or search for the brand you want.
1. Open the Alexa app
2. Press the menu on the left-hand corner
3. Choose Skills from the menu
4. Add them under the mart Home’ category
How Are Other Echo Products Different From Echo Dot?
Whether you buy Echo Dot, Echo Spot, Echo Show, or Echo Plus, there is one thing common in all of them – they all feature the voice-command assistant Alexa. Despite the similarity, there are a few basic differences that I have outlined below:
Echo Show and Echo Spot
Show and Spot come with a touchscreen display that lets you see things instead of just hearing them. So, you can see real-time videos from the connected cameras. You may do voice calls and even watch Amazon videos on them.
Echo Plus
This Echo device from Amazon comes with a built-in Zigbee controller(see next question), which means you can control certain devices without having to connect to a third party app or separate hub. I will tell you more about Zigbee later in this article.
Before buying your Echo, you need to make up your mind on whether you need a display or not. A basic Echo Dot only has speakers and no display.
What is Zigbee controller?
As promised, I will briefly tell you about the Zigbee controller available in Echo Plus. This is basically a wireless standard, also referred to as a mesh network that is used in various smart home automation systems. This is a standard used by brands like Philips, Belkin, Huawei, Nokia, Samsung and so on.
So, what does it exactly do? In the Echo Plus, Zigbee controller enables you to set up your smart gadgets without having to follow the manufacturer’s rule. Zigbee empowers your Echo Plus to directly communicate with the smart devices and recognize its identity. With it, you can directly control a device without activating its app or requiring a hub.
Although I love the Zigbee option, it comes with a disadvantage. For example, if you use Zigbee for Philips Hue on Echo Plus, you will not have to install the Hue app or Hue Hub, but this will prevent your access to the advanced controls such as custom colors, firmware updates, and creating scenes.
I personally prefer using Zigbee controls for the basic gadgets like cheap smart bulbs. For the advanced and feature-rich gadgets, Zigbee is not a suitable option as it limits you from utilizing the controls to the fullest.
Why Do You Need A Smart Home Hub?
If you are planning to build a smart home automation system, setting-up a hub is almost a prerequisite. The biggest advantage of having a hub is that you can add numerous Alexa-controlled smart devices to it and have one-point access to control the multiple devices.
Smart Hub brings all your technical devices in one plane. If you use smart bulbs from different manufacturers, you can connect them all to the hub so that you can simply give commands to the hub instead of dealing with separate apps.
Another advantage of using a hub is that it gives you easy remote access to the smart devices at home. For example, you can tell the hub to switch on the smart heating system to keep the house warm and smart plug connected to the cooker to keep the food ready when you are back from work.
You can also use the smart hub to keep an eye on your property, kids, elderly, or pets at home while you are away. I frequently need to go out of town for business trips so I use my smart hub to control various devices to create an illusion of occupancy to deter the intruders.
The best part is – setting up a hub does not need technical knowledge and anyone with basic Internet knowledge should be able to do it with ease. One downside is that it adds an extra device or wire to your WiFi router.
With Echo Plus, you can skip this part as it can directly communicate with most of the devices without needing a hub.
How Are Smart Speakers Different From Smart Hubs?
Customers are often confused between smart speakers and smart hubs, so here is the answer to help clear the confusion. The smart speakers are activated by voice while the hubs need an app. To start using a smart speaker, you will need to use voice commands or ask questions. For example:
“Ok Google, show me nearby restaurants”
Or,
“Ok, Google, what is the capital of Australia”.
With the smart speaker’s app, you can change the settings and connect specific devices, but you will not be able to fully control them. The smart hub, on the other hand, enables you to control the gadgets connected to it.
With a hub, you can have access to the dedicated controls on a device’s own app. For example, you can have control over color and temperature for your smart lighting solutions. While both smart speakers and smart hubs provide control over the smart devices at home, the hub helps you achieve a more complete home automation.
To make it simpler, the smart hubs work with a plethora of smart devices that use different protocols such as Bluetooth, Wi-Fi, Zigbee, and Z-Wave. It translates them to understand and speak one common language.
As smart hubs come with their own dedicated app, they can provide detailed customization for different smart devices. This is something you cannot expect from a smart speaker, as it only understands voice-activated commands for basic controls.
Finally, not all smart devices will be compatible with a smart speaker, but you can connect almost all of them to a smart home hub.
Should I Get a Smart Home Hub?
Well, I would say this boils down to how advanced or automated you want your smart home to be. If you wish to just use a couple of smart devices to save time, a speaker that takes your voice commands may suffice.

However, if you dream of a completely automated home where one command can trigger multiple functions and get things ready for you without you having to raise a finger, a smart hub is your best bet! Those who wish to have a completely automated home and enjoy the convenience of voice-controls may consider investing in both a smart hub and a speaker.
My Wink Hub 2 works like the boss of all smart devices and appliances in my smart home. It tells the devices when to turn on, off, and perform various other function. As a smart hub, it automates all devices and appliances so that they function by simply listening to my voice commands (Echo Dot + Wink Hub). I can also access them remotely with a mobile app.
How To Ensure Optimum Connectivity Among Different Devices?
To make sure that all the smart devices by different manufacturers are on the same plane, you need to buy a hub that can connect with all of them. When buying smart devices, you must ensure that the devices respond to a protocol or language that is understood by the smart hub. If they understand different languages, this will result in chaos and your dream of creating a fully automated smart home will remain fulfilled.
To be on the safe side, I chose a smart hub that has uniformed sensors so that it can be placed in any location of the house to connect to a plethora of products such as garage doors, thermostats, security systems, door locks, lights and so on. Alternatively, you may get a smart hub that comes with an open software application to enable smart device manufacturers to integrate their software in order to make them work with different hubs.
Another option is to buy smart hubs that are capable of understanding a few protocols via radio waves. You can also find cloud-based options that allow devices to communicate with one another while extending their functionality to understand commands and functions.
With the rising demand for different smart devices, various manufacturers are working on creating hubs that can work with different types of protocols and smart devices, however, they are still in the trial phase.
What Are The Different Protocols?
If you are a beginner like I was when I started building my smart home, it can be confusing to understand the different smart hubs and their protocols. I have listed the four different protocols to give a fair idea of what they are so that you can make an informed choice.
Bluetooth
This is one of the oldest methods used for wireless connections and it uses frequency and encryption to establish secure transmissions. Although it may not be as high as Wi-Fi in terms of bandwidth, it may be more flexible with the type of commands sent and received.
Another type of Bluetooth is known as Bluetooth LE or Low Energy, which consumes significantly less power when compared to Wi-Fi. It may be used to create a web of a network that allows devices to send and receive commands over a wide range.
Wi-Fi
It sports a higher-bandwidth network than Bluetooth and it is primarily used for streaming media and connecting to the Internet of Things. It also forms a useful medium for smart home devices to communicate with the hub.
One downside is that the high bandwidth network tends to drain out the battery power so you must keep a check on the battery-powered devices. We would recommend that you keep the devices connected to a power source to ensure that they never run out of juice.
Zigbee and Z-Wave
These are alternative options that use mesh networks to expand their range of coverage. However, they use less power, which is usually restricted to the number of commands they can communicate with other smart devices.
Zigbee and Z-Wave are mainly suited for the smaller applications such as motion sensors and smart light bulbs. As these protocols are not compatible with computer, smartphones, or tablets, you will need to use the Ethernet cable or use the Wi-Fi network to run them.
What Are Other Smart Devices I Recommend?
1. A smart home thermostat
The heating or cooling systems are an integral part of the home, so a smart home thermostat is a must. By connecting it to a hub, you will be able to control climate by giving voice commands to Alexa.
I use the app to remotely turn on the smart home thermostat so that I come home to a comfortably warm home. It not only adds convenience to my life but also saves money and energy.
2. A front-door security camera
With front door cameras, you can now tell who’s at the door without having to get up when the bell rings. The security cameras also help you keep an eye on what is happening inside and outside the house, so any intruder in the property or any trouble inside the house can be detected at the earliest.
I prefer the Nest cameras as they come with speakers so I can talk to my pets and elderly parents when they are alone at home. It gives me peace of mind knowing that they are safe.
3. Smart smoke detector
The smoke alarms are expensive, so I use Roost, which is a cheaper and smarter option. This is a smart battery (see Amazon) that can be used with old smoke detectors to send a notification to the phone if there is smoke. The main problem of this smart batter is it not compatible with Alex and the batter can only last for 3 to 4 months.
5. Smart Home Switches
If you don’t want to invest in smart bulbs, a simpler alternative is to replace the traditional switches with smart home switches. This can turn your otherwise ordinary light bulbs into smart devices. This can help you schedule, automate and remotely control lights using a mobile app from anywhere in the home or where you have a Wi-Fi connection.
6. Smart Automated Blinds
I am a fan of automated shades and blinds as they give me the freedom from having to draw and close them manually every time. The smart automated blinds also make it easier to access the hard to reach windows without having to get up from the seat. They are the perfect solutions for the elderly or disabled.
Final Words
Building a smart home takes a lot of thinking, planning, research, and investment. I would suggest that you first create a strategy or plan where to start and then slowly build up the network of smart devices to transform the entire space. Refer to this buying guide to help you in making the right choices when buying smart devices.
I would like to re-emphasize on buying smart devices that can communicate with more than one protocol and offer a wide range of sensors. Even when you are working with Alexa, it will take time to build up the vocabulary, skills, and ensure that the assistant gets accustomed to your voice.
I took me several tweaks, voice modulation, tests, and trials to build my smart dream home. Apt with the right information and knowledge, you too will be able to build a smart home that is no less than paradise on earth!