Every time I walk past an old hutch at a thrift shop or scroll by one online, my mind fills with ideas. There’s just something special about taking a piece that’s seen better days and giving it a fresh start. I know how exciting it feels to imagine that old hutch standing proud in your space, showing off your creativity and personal touch for everyone to see.

Transforming a hutch is one of the easiest ways I know to make a big change in a room without buying something new. I love that anyone can tackle this kind of project, whether you’re a first-timer or you’ve refinished furniture before. If you’ve ever wished your furniture told your story or matched your style, you’ll find inspiration here to help you start your own beautiful redo.
Chalk paint with contrasting inside back panel

I love using chalk paint on a hutch and then adding a surprise with a different color on the inside back panel. It’s a simple way to bring new life and fresh energy into older furniture.
Sometimes I pick a bold color inside, while keeping the outside soft or neutral. The contrast makes all the shelves and decor really stand out.
This trick works especially well if your hutch has glass doors. When I tried this, it turned my piece into a real centerpiece. You can see examples of this style in many chalk-painted hutch makeovers.
Two-tone paint finish for modern flair

I love how a two-tone paint finish can totally change the look of a hutch. It adds instant style without being hard to do. Sometimes I paint the outside one color and the inside another to make the shelves pop.
It’s fun to mix bold and neutral shades for a unique touch. This way, the hutch stands out as a feature in any room. I found that this idea works for both new and vintage pieces.
If you need inspiration, you can check out these painted hutch makeover ideas. Mixing colors lets you make the piece your own with very little effort.
Distressed white paint for shabby chic style

I love using distressed white paint to get a shabby chic look on a hutch. It gives the piece a soft, vintage feeling that fits well with many rooms.
My favorite way is to paint the hutch white, let it dry, and then gently sand the edges. This makes the hutch look like it has a story and some history.
Distressing furniture with white paint is simple to try, even for beginners. I always feel inspired when I see how a plain hutch can turn charming and cozy, just with a bit of paint and sanding. For more ideas, you can check out these shabby chic hutch makeovers.
Natural wood stain to highlight grain

I love using natural wood stain when I want my hutch to look warm and real. It brings out the grain, making every detail and swirl of the wood easy to see. I always reach for a good foam brush and a clean cloth for this job.
To get a nice result, I start by lightly sanding the surface. Then I apply the stain in even strokes, following the direction of the wood grain.
Letting the stain dry fully makes the color rich but still natural. I like to finish with a layer of wax or clear coat for extra protection, which really lets the wood shine. For more details, you can check out a DIY hutch makeover tutorial.
Add new brass or vintage hardware

I love how much of a difference new hardware can make on a hutch. Swapping out old knobs for shiny brass handles gives the piece a touch of elegance without much effort.
Sometimes I hunt for vintage hardware at thrift stores or flea markets. Unique pulls or handles add personality and charm that you just can’t get from something new.
If I want a mix of old and new, I sometimes combine different styles. Mixing brass with classic shapes looks timeless and inviting. Little details like these always make my hutch redo feel special.
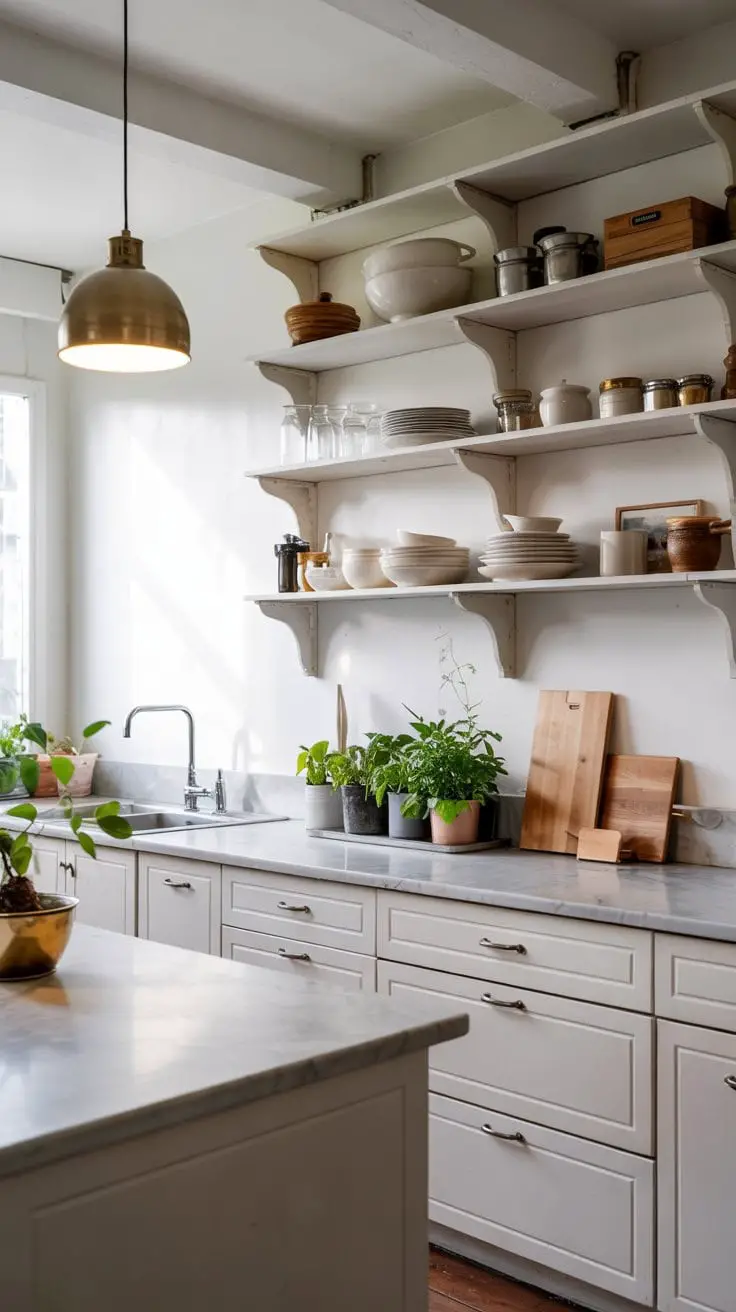
Remove doors for open shelving look

One of my favorite ways to refresh an old hutch is to remove the cabinet doors. Taking the doors off makes the whole piece feel lighter and more open.
With the doors gone, I get plenty of space to show off my favorite dishes and décor. It also makes it much easier to grab things I use every day.
If I want a custom vibe, I can add a fresh coat of paint or install a bit of trim on the shelves. Ideas like these can really make a hutch feel modern and inviting, like something out of a magazine. For tips and inspiration, I often check out these open shelving kitchen ideas.
Install LED strip lighting inside

I love adding LED strip lights inside a hutch. It makes everything inside brighter and easier to see. Even a simple set of lights can make a huge difference.
I usually place the strips at the top or along the sides. The soft glow highlights my favorite dishes and decorations without looking too harsh.
Attaching the strips is pretty easy. Most come with sticky backs, so I just peel and stick. For more tips, check out this guide on how to install under cabinet lighting with LED strip lights.
Use wallpaper or fabric on interior backing

I love how easy it is to give a hutch a fresh look by adding wallpaper or fabric to the back panel. It surprises me every time how much personality it adds.
Sometimes I use bold floral patterns to brighten up my dishes. Other times, I choose calm textures for a softer effect. Both choices make the shelves pop.
This trick works well if the inside looks worn or plain. Even removable wallpaper is an option if I want to change the look later. You can check out creative ideas for using wallpaper on a hutch or even try fabric for a unique touch.
Convert lower cabinet into a coffee bar

I love turning lower cabinets from old hutches into bright and organized coffee bars. First, I clear out the shelves and give everything a good wipe down. A fresh coat of paint can make the whole piece feel new again.
After the paint dries, I install hooks or small shelves for mugs. Baskets and bins help me store coffee pods, sugar, and tea bags neatly.
Transforming a lower cabinet gives me a dedicated spot for my morning routine. It’s amazing how a simple update can make a big difference. If you want more inspiration, check out how others have made a coffee bar from an old china hutch at this DIY coffee bar transformation.
Add glass shelves for elegant display

I like to use glass shelves when I rework a hutch because they make the whole piece feel lighter and more open. Glass lets in more light, so the items I display stand out better.
Sometimes I add extra glass shelves to fit more dishes or collectibles. It also helps me keep things organized while still looking neat.
When I want an elegant look, I carefully clean the glass and choose only a few pretty items to display. This way, everything on the shelf looks special, not crowded. For more ideas and inspiration, I check out styles for glass front hutches online.
Stencil decorative patterns on doors

I love using stencils to add decorative patterns to hutch doors. It’s an easy way to bring in style without needing professional skills. With a few simple tools, I can transform plain surfaces into eye-catching features.
I’ve tried everything from delicate florals to bold geometric prints. Each design brings a different mood to the piece. Large-scale stenciling lets me get creative with colors and patterns, just like the ideas shared in this large scale stenciling hutch makeover.
Bright paints and fun stencils make old doors look new again. It’s rewarding to see such a big change from such a simple technique.
Replace solid doors with glass-paneled ones

I love the look of glass-paneled doors on a hutch. Swapping out the solid doors for glass instantly makes the whole piece feel more open and airy. It gives me a chance to show off my favorite dishes, glasses, or treasured keepsakes.
It’s a doable project even for someone who’s new to DIY. I’ve followed online tutorials to guide me step by step. I find that adding glass doors helps modernize an older hutch while keeping its classic charm.
For ideas and inspiration, I check out photos of painted china hutches with glass doors that other people have shared. This always gets my creativity flowing for my next redo.
Create floating shelves from hutch parts

I love turning unused hutch tops into stylish floating shelves. It’s a simple project that gives old furniture new life. The solid wood in most hutch tops works well for this.
After removing the top, I clean it up and cut it to size if needed. I sand and paint or stain it to fit my space.
Once finished, I hang the shelf with sturdy wall brackets. The result is a one-of-a-kind display you won’t find anywhere else. It’s amazing what you can do with an old hutch top and a little creativity!
Add crown molding for classic touch

I love how crown molding can make a hutch look more refined. Even a simple cabinet feels elegant with this small detail on top. It draws your eye upward and adds shape to the piece.
I often choose classic white or match the molding to the hutch’s paint. There are so many styles out there, from traditional to modern looks. If you want ideas, you can check out these crown molding designs.
Putting up crown molding is easier than it seems. I measure, cut, and glue or nail it in place. This upgrade brings a polished and timeless feel to my hutch every time.
Mix matte and glossy paint finishes

I love using a mix of matte and glossy paint finishes when I redo a hutch. It’s an easy way to add depth and interest without making things too busy. I usually paint the main parts matte so the hutch feels calm and modern.
Then I pick a few details, like the drawer fronts or trim, and use glossy paint there. The shine catches the light and makes those spots pop. This method works well if you want your hutch to look special but not overdone.
I’ve noticed that mixing finishes can help highlight the parts of the hutch that I’m most proud of. It’s a simple trick that really upgrades the whole look.
Choosing the Right Paints and Finishes
Choosing paints and finishes for a hutch can be fun, but also needs some careful thought. The right options help bring out color, add style, and make sure your hard work lasts.
Eco-Friendly Paint Options
I try to pick paints that are safer for my family and better for the planet. Low-VOC and zero-VOC paints are some of my favorite choices because they keep the air inside my house cleaner. Brands often show these labels on cans right at the store, making them easy to find.
Milk paint and chalk paint are also eco-friendly. Both of these can give a soft, vintage look, and chalk paint is super popular for hutches because it sticks to wood and covers well with just a few coats.
Here are some eco-friendly paint features to consider:
| Paint Type | Features | Great For |
|---|---|---|
| Milk Paint | Non-toxic, matte look | Antique or rustic finishes |
| Chalk Paint | Low odor, easy cleanup | Farmhouse and shabby chic |
When I’m painting, opening windows helps the air flow and lowers any smells from the paint too. That simple step keeps the room fresh for everyone at home.
Techniques for a Lasting Finish
A good finish on a hutch makes it look better and keeps it protected from scratches or water marks. I always start with a light sanding, using a fine grit sandpaper, to smooth out rough spots and help the paint stick. After sanding, I wipe off the dust with a damp cloth.
For primers, I use one suited for the wood type, which helps the paint grip and stops stains from bleeding through. I put on paint using a quality brush or small roller for even coats. Waiting until the first layer dries before adding the next one is key.
To seal my work, I usually pick a clear wax or water-based polyurethane. Wax gives a soft finish, while polyurethane is tougher and good for busy spots. Here’s a quick list of steps I follow for a lasting result:
- Sand lightly and clean the surface
- Apply primer and let dry fully
- Use thin paint coats and allow them to dry
- Seal with wax or topcoat for protection
These steps help my hutches look fresh and keep their charm for years. For more painted hutch ideas and details on finishes, I recommend checking out these creative chalk painted hutch examples.
Styling Tips to Highlight Your Hutch
Small updates can make a big difference when refreshing a hutch. With the right touches, I can turn a simple piece of furniture into the focal point of my space.
Incorporating Decorative Hardware
I always notice how much of an impact new hardware can have. Swapping out old knobs or pulls for fresh ones—like brass, glass, or ceramic—instantly adds personality. If my hutch is vintage, I’ll go for classic metal to keep its charm. For a more modern look, I like simple matte black or brushed nickel handles.
Before I install new hardware, I check the spacing on the existing holes. Sometimes I need to fill old holes with wood filler and drill new ones. This way, I get a clean finish. Mixing styles with different drawer pulls and knobs can also make things playful but not too busy.
A quick tip: I polish old hardware if I’m keeping it. Clean, shiny pieces always stand out, even if they’re original.
How to Style Display Items
Every hutch looks more inviting when it shows off a mix of objects. I use a mix of textures, heights, and colors. Stacking books or plates adds layers. I keep similar colors together for a calm look. If I want it bold, I might paint the inside back of the hutch a contrasting color to make display pieces pop, as suggested by some decorating experts.
I avoid crowding every shelf and give important pieces space to stand out. Using baskets, small plants, or framed pictures brings in warmth and interest. Rearranging items every few months helps my hutch stay fresh and fun.
Frequently Asked Questions
When I redo a hutch, a few updates can really change how it looks and feels right away. Paint choices, hardware, and new uses can take a hutch from outdated to fresh and fun.
How can I update an old hutch to give it a modern twist?
I like to use a two-tone paint finish, adding a bold color on the inside back panel. This adds instant style and keeps the look clean and modern. Swapping out basic knobs for sleek hardware can also make a huge difference.
What are some color schemes that work well for refreshing a tired hutch?
I’ve had lots of success with chalk paint in classic white or soft pastels for a light, airy feel. For contrast, I sometimes do a deep blue, green, or even black on the outside, with a lighter color inside. This makes the hutch really stand out in any room.
What kind of hardware swaps make the biggest impact on a hutch makeover?
Changing out old hardware for brass pulls or vintage glass knobs is one of my favorite tricks. Modern metal handles can create a fresh look, while antique or mismatched knobs give it character and charm with very little effort.
Can you suggest ways to repurpose a hutch for uses other than dish storage?
I love turning a hutch into a coffee bar, craft supply center, or even a bookshelf. Removing some doors or shelves makes it more open, and baskets or bins can help organize items that aren’t dishes. It’s a fun way to give an old piece new life.
What are the best techniques for distressing a hutch for a shabby chic look?
I use sandpaper to lightly remove paint on edges and corners after painting. Sometimes, I’ll use a wax or glaze to highlight details. Chalk paint is easy to distress, making it perfect for a soft, worn-in style that fits really well with shabby chic decor.
Where can I find step-by-step guides for DIY hutch restoration projects?
I often turn to online tutorials with photos and product lists. Websites like Start at Home Decor and Jolie Home feature detailed guides and plenty of before-and-after photos that show what’s possible with a bit of time and creativity.

: Inspiration for Creating Your Dream Space")