Whenever I look at my space, I always want it to feel special and reflect my style, even if I’m working with a tight budget or a simple room. That’s why I’m obsessed with getting creative with IKEA IVAR units—there are so many ways these basic pieces can completely transform a room. It’s amazing how a few simple changes can turn a blank space into something that feels both functional and beautiful.
If you’re searching for fresh ways to add character or divide a room with a personal touch, you’ll love these easy IKEA IVAR room divider hacks and ideas. I find so much joy in the process, from brainstorming new designs to that “wow” moment when everything comes together. Whether you’re trying to carve out a cozy nook, add storage, or simply make your home look a little more ‘you,’ these inspiring projects can help you create a space that truly feels like yours.
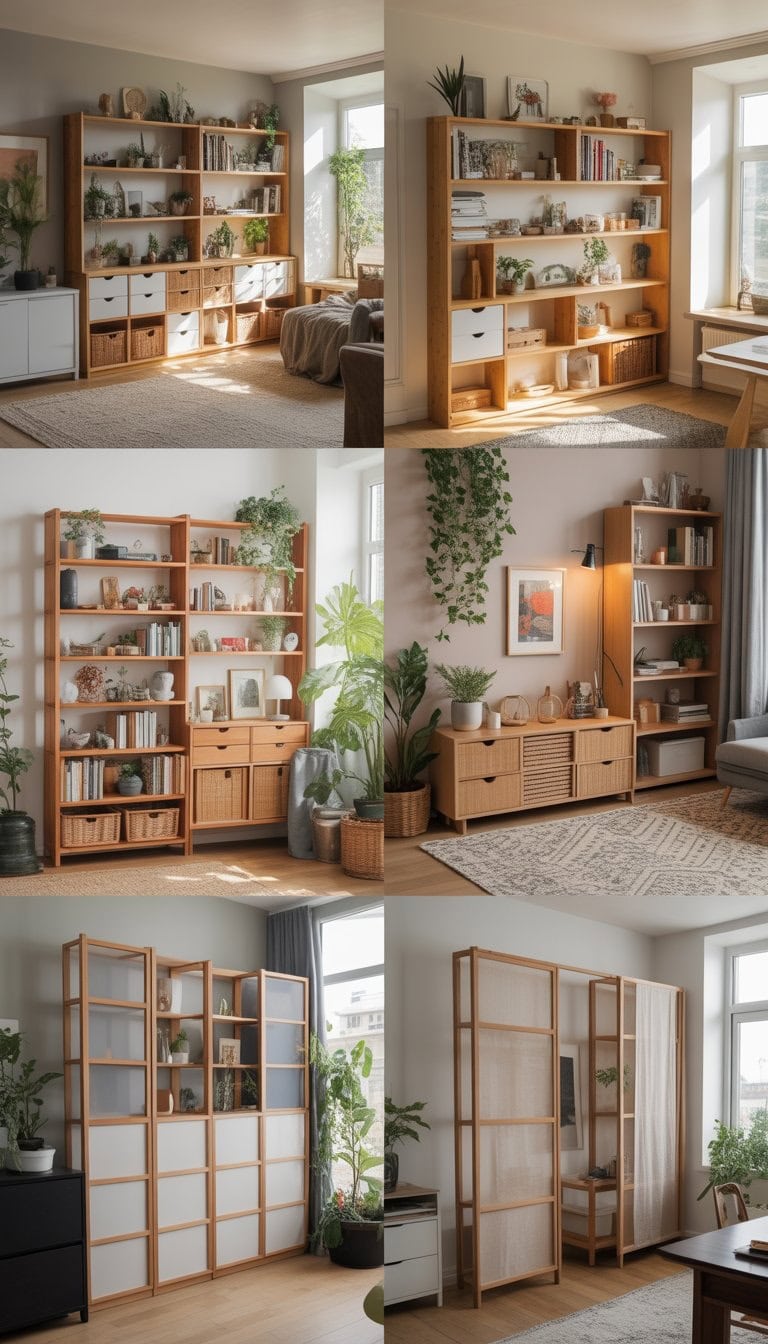
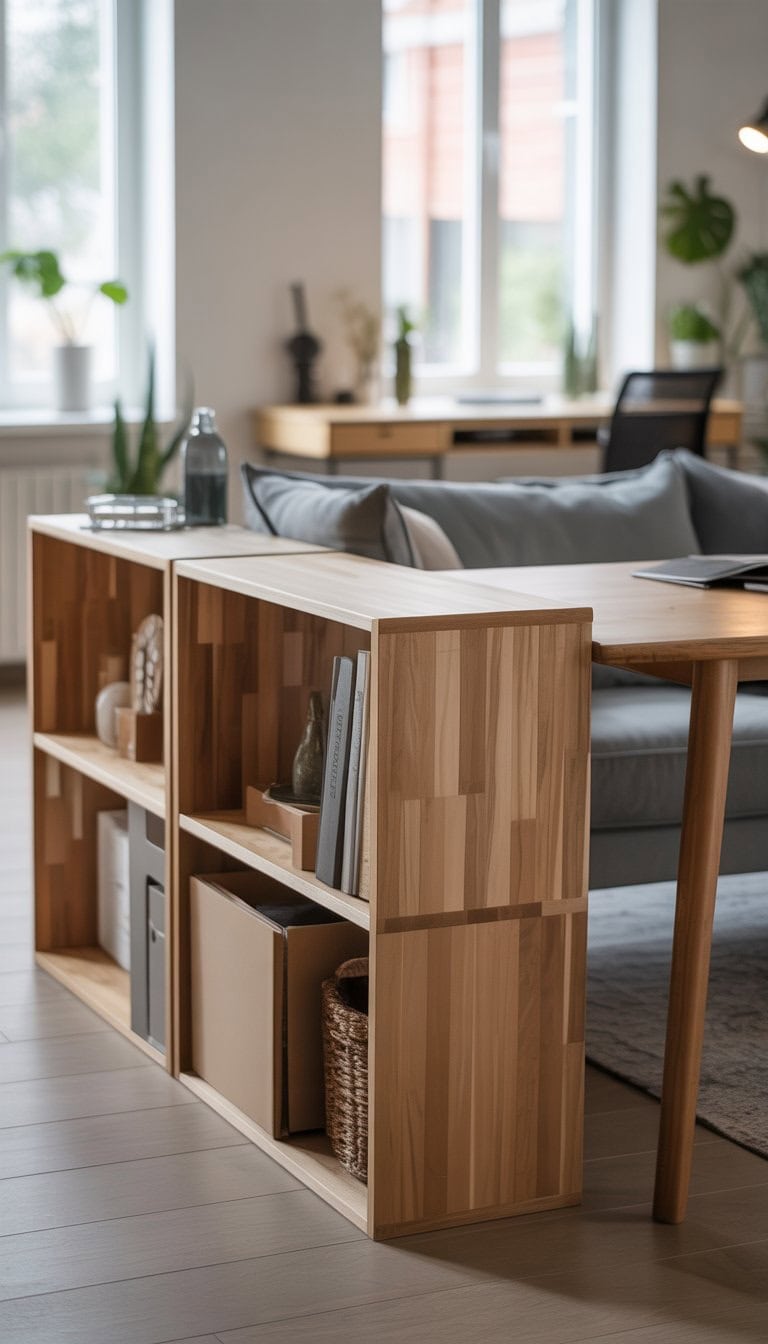
Turn IVAR shelves sideways for an instant customizable room divider

When I first tried turning my IVAR shelves sideways, I was surprised at how easy it was. The open sides created a simple divide between spaces, but the shelves still let light through.
I found that it works well for separating a living area from a workspace. With the horizontal layout, I could vary the shelf heights and display my favorite books or plants.
If I wanted more privacy, I added baskets or bins to some shelves. This allowed me to hide clutter and keep things organized. The best part was being able to move or adjust the divider whenever I needed. For more ideas, I got inspired by these IKEA IVAR room divider hacks.
Add fabric panels between IVAR shelves for a soft, light-diffusing effect.
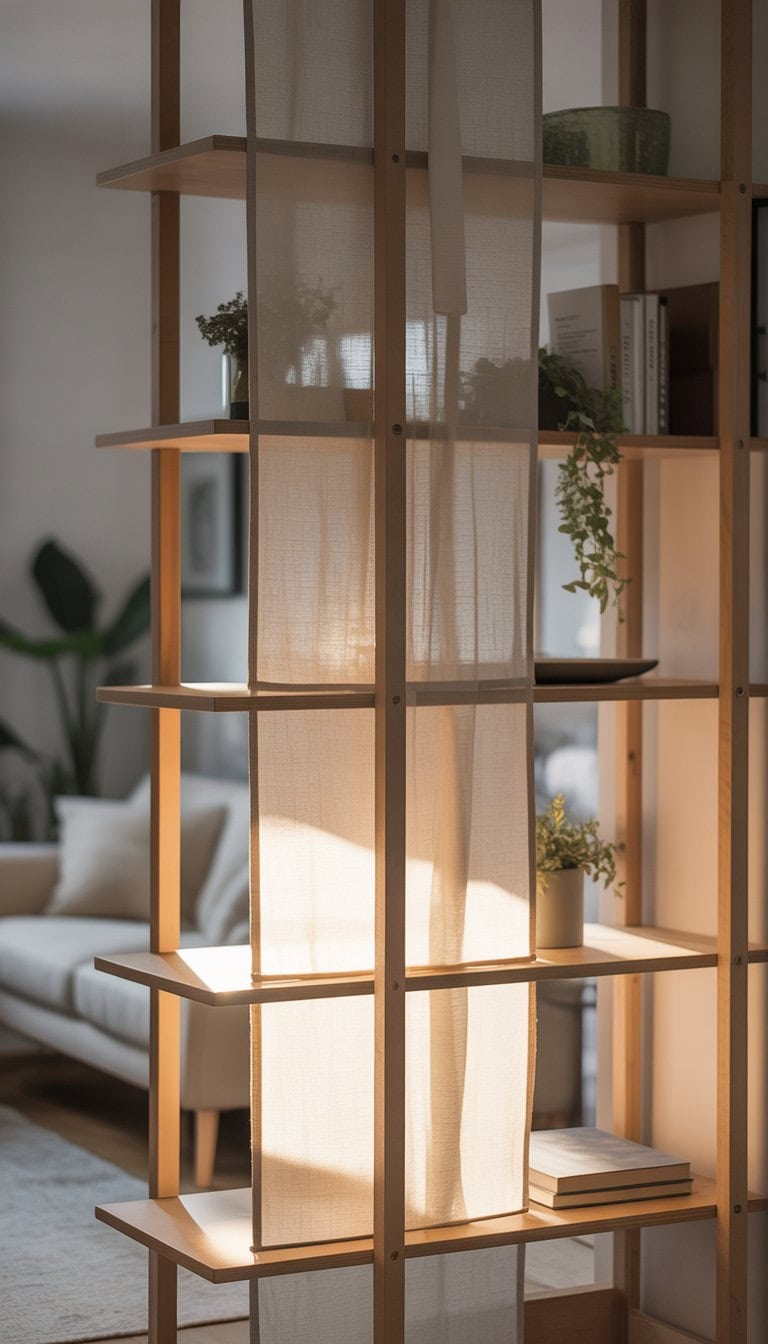
One of my favorite ways to use IVAR shelves as a room divider is by adding fabric panels. I like how fabric makes the divider feel airy and soft.
All I do is attach lightweight cotton or linen fabric to the side units using staples or a staple gun. For a cleaner look, I sometimes use hook-and-loop strips.
The natural light that filters through the fabric creates a cozy atmosphere. I can switch out the panels when I want a new color or pattern.
This idea is budget-friendly and easy to adjust. If I want extra privacy, I pick darker or thicker materials. For a brighter feel, I go with white or sheer fabric. I got more inspiration from similar IVAR projects highlighted on Pinterest.
Paint IVAR in bold colors to make your divider pop
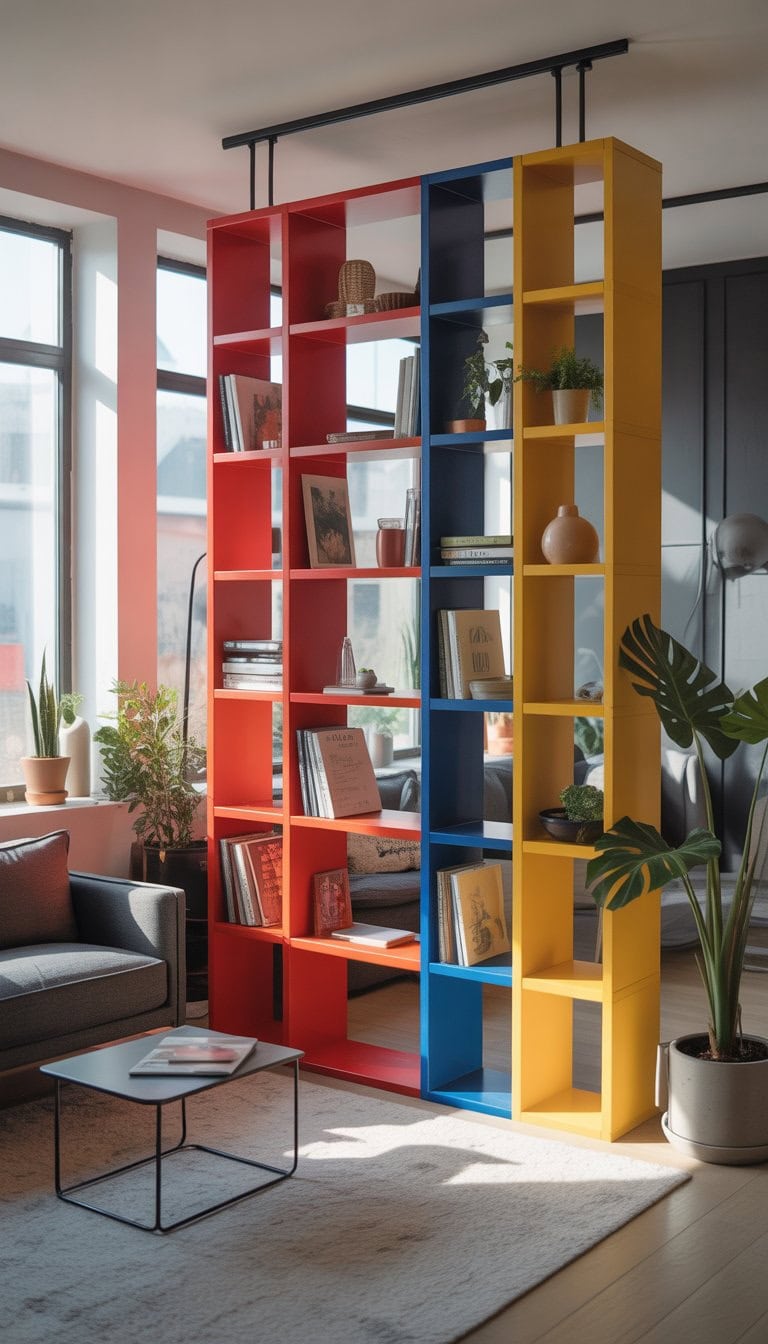
I like how a splash of bold paint can completely change the look of the IVAR shelves. Bright colors like green, blue, or even a fiery red grab attention and bring life to any space. Neutral rooms suddenly feel cheerful when I add these fun shades.
When I paint my IVAR divider, I use simple supplies and easy steps. I start with a primer so the color looks even and lasts longer. Then, I brush on two coats of my favorite bold paint.
If you want a smoother finish, you can use a small roller. I like adding painter’s tape for crisp lines or patterns. It helps me make my divider look unique and stylish. For more inspiration, you can check out these Ikea Ivar room divider hacks and ideas.
Attach casters to the bottom for a movable room divider.
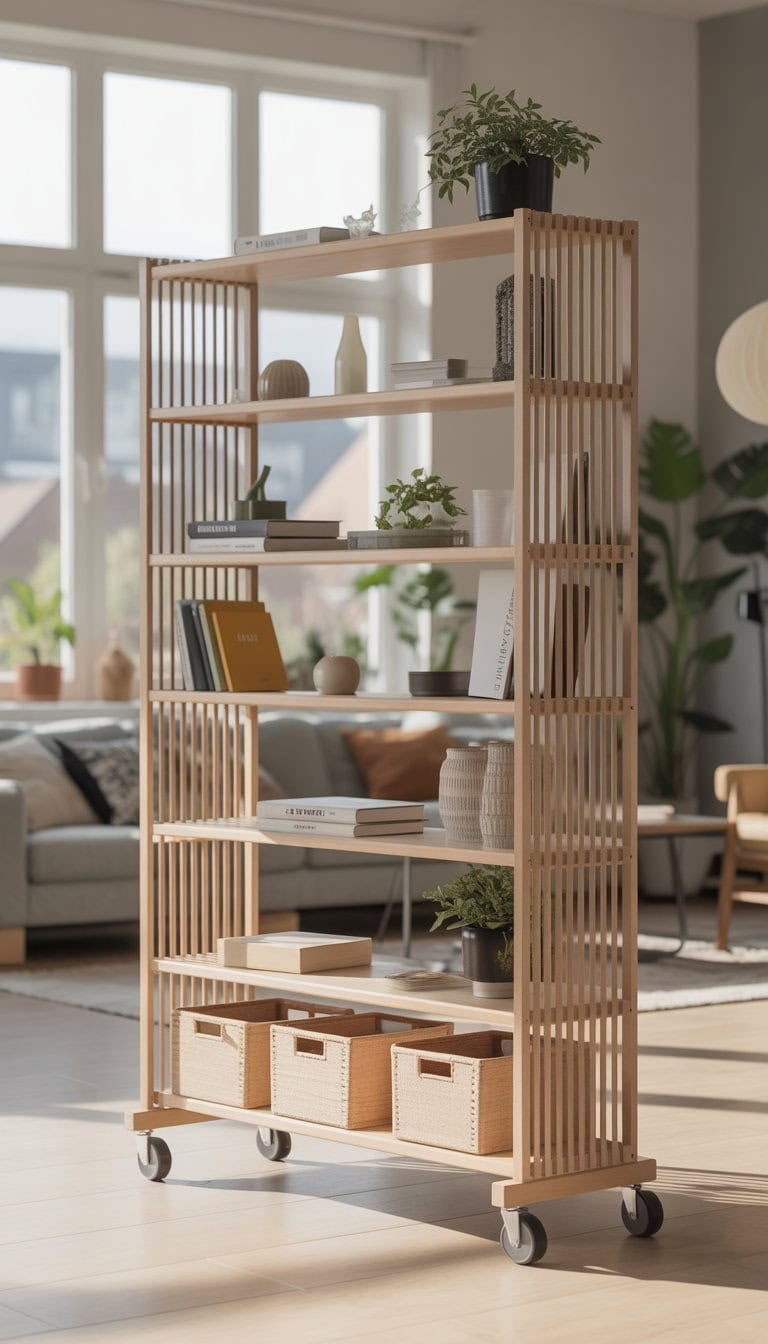
I love having flexible spaces at home. By attaching casters to the bottom of my IKEA Ivar room divider, I can easily move it around whenever I need to change up the layout. It makes rearranging my space quick and simple.
All I had to do was screw sturdy casters into the bottom corners of the divider. I made sure to pick ones that lock, so the divider stays in place when I want it to.
If you want tips on how to add wheels, I found it helpful to check out advice from others, like this discussion on adding wheels to a room divider. It really made the whole process easier and boosted my confidence to try it myself.
Use rope or wire mesh backing to add texture and privacy.
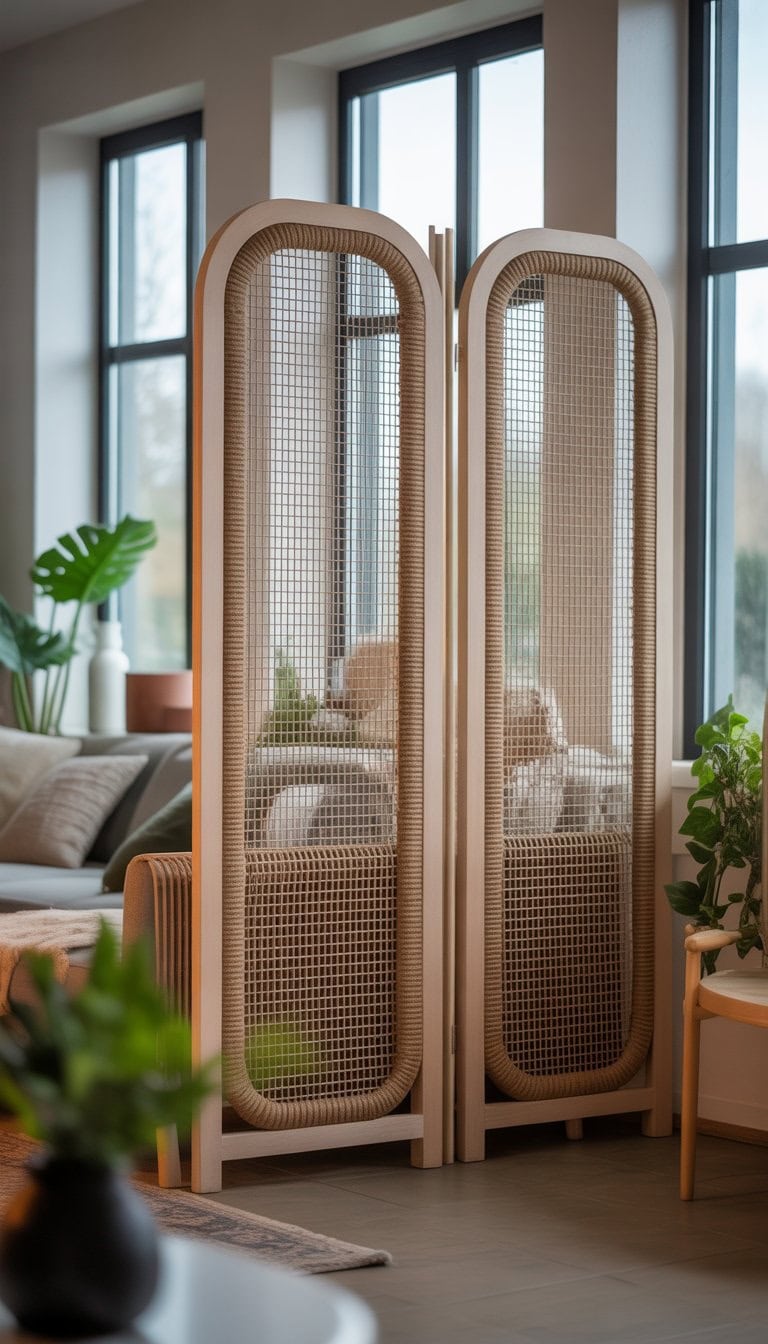
I love using rope or wire mesh on my IKEA IVAR shelves when I want to boost both texture and privacy. These materials add just enough coverage without making the divider feel heavy or closed off.
Rope is easy to work with and brings a laid-back, handmade vibe to any room. I simply weave it through the wooden slats, sometimes creating patterns or leaving gaps for a breezy look.
Wire mesh backing is another favorite of mine. It gives structure while making the shelf feel airy. I’ve even seen people use chicken wire and add greenery or flowers for a creative touch.
Both options let me update my space fast, and I can always swap them out as my style changes.
Incorporate plants on IVAR shelves to create a living green wall
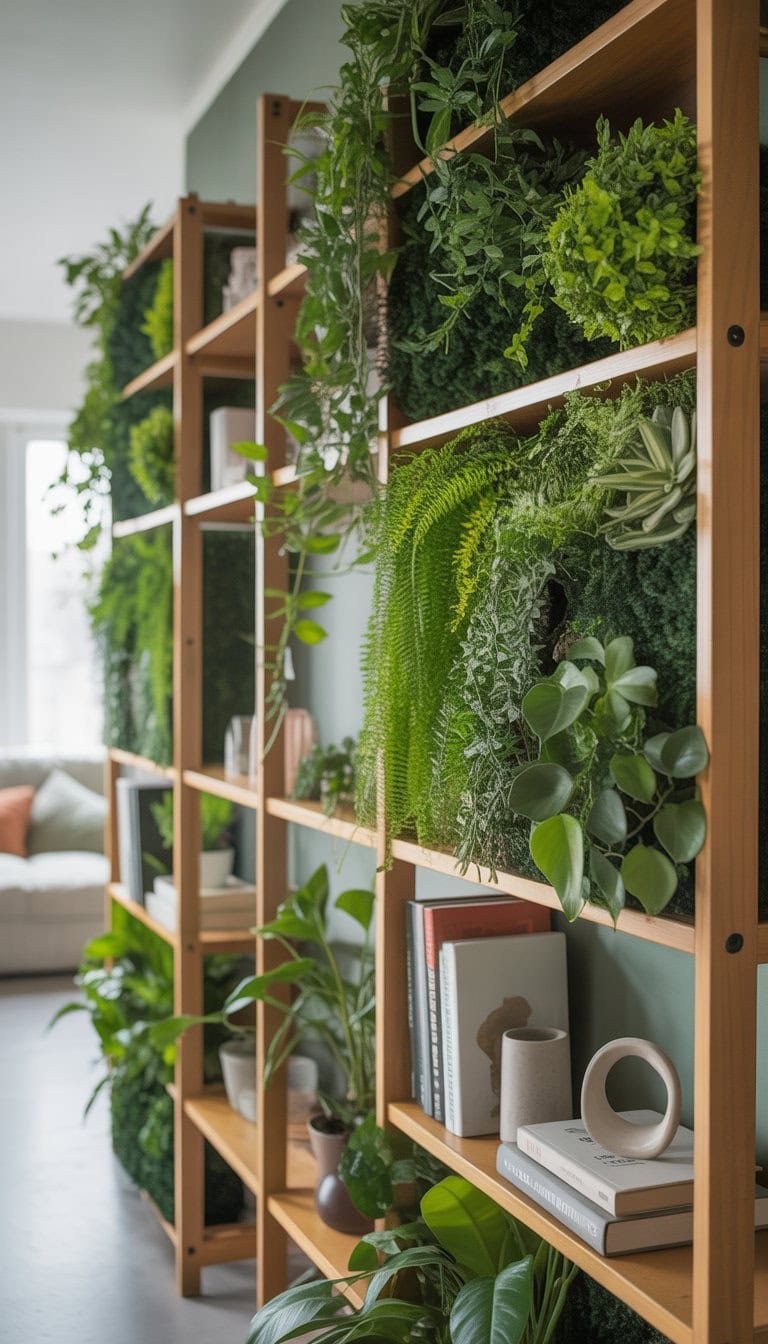
I love turning a plain IVAR shelf into a fresh green wall. Adding plants gives my space a calm, natural feeling. I start by placing small and medium potted plants on different shelves.
Sometimes I add hanging plants that drape over the edges. This gives more layers and makes the shelf look lush. I use plant pots in different colors and sizes for a fun mix.
To help the plants thrive, I make sure they get enough light. Sometimes I even add a grow light nearby. Creating a living green wall with the IVAR is an easy way for me to bring nature indoors. I find it looks good in my living room or near a window, just like in the IVAR plant shelf ideas.
Stain the wood in golden ash for a classy, refined finish

When I want my IKEA Ivar room divider to look a bit more special, I reach for golden ash stain. It completely changes the vibe, making plain pine look more expensive and timeless. The soft golden color adds warmth but still looks simple.
I find this finish really highlights the character of the wood grain. After sanding, I use a clean brush or rag to spread the stain evenly. It’s a quick project that does not need fancy tools.
Taking the time to stain the wood helps the divider blend into many home styles. It works for modern, boho, or even classic looks. If you want ideas or examples, I found a useful tutorial that uses golden ash stain for a DIY Ivar divider.
Create a folding screen effect by connecting multiple IVAR units with hinges
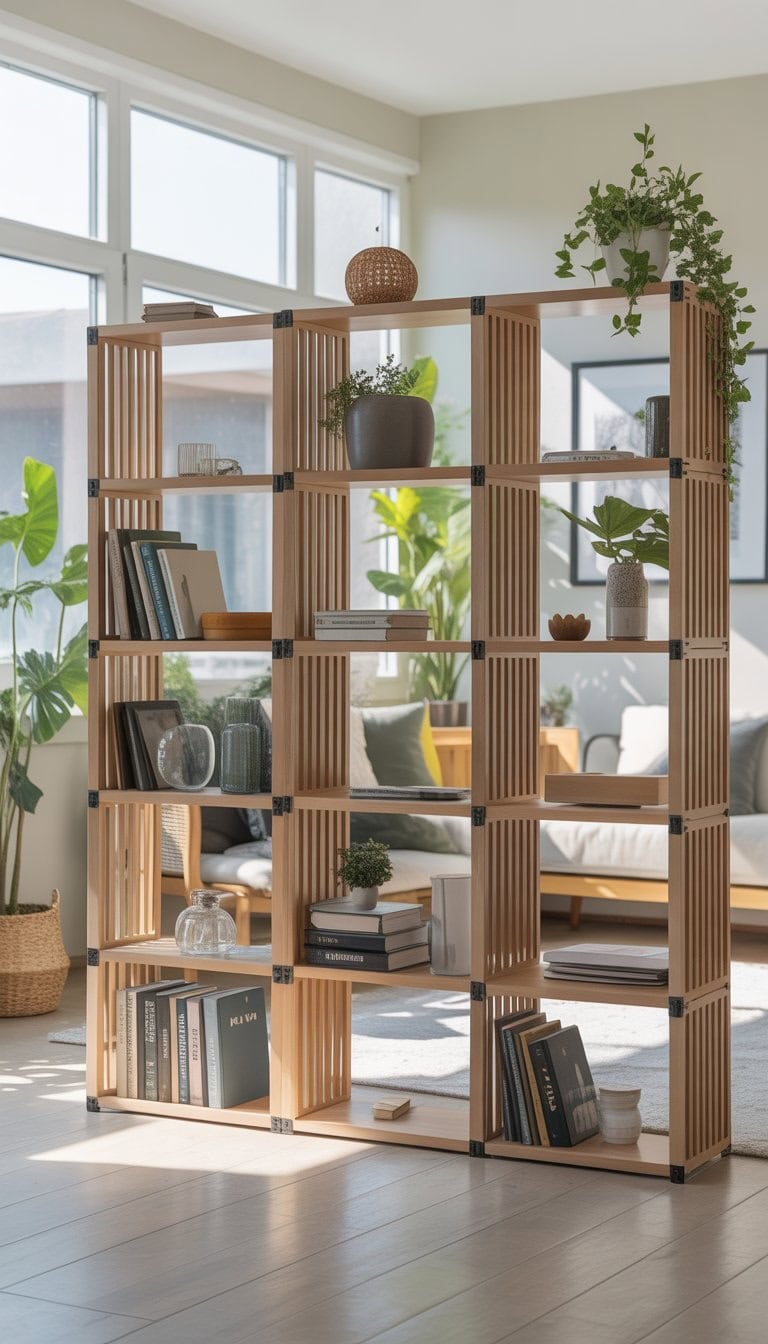
When I want to divide a space but keep things light and flexible, I like to connect IVAR side units with simple hinges. It’s a fast way to make a folding screen that stands out and can be moved around whenever I want.
All I have to do is line up the IVAR units side by side and attach hinges at the joints. This creates panels that fold, kind of like an accordion. The effect feels custom and it’s easy to change or decorate.
What I love is how many ways I can make it unique. I might add fabric, paint, or even photos to each panel. For DIY inspiration and more ideas on how to create a folding screen with IVAR, check out these folding screen hacks on IKEA Hackers.
Add LED strip lights along shelves for ambient lighting
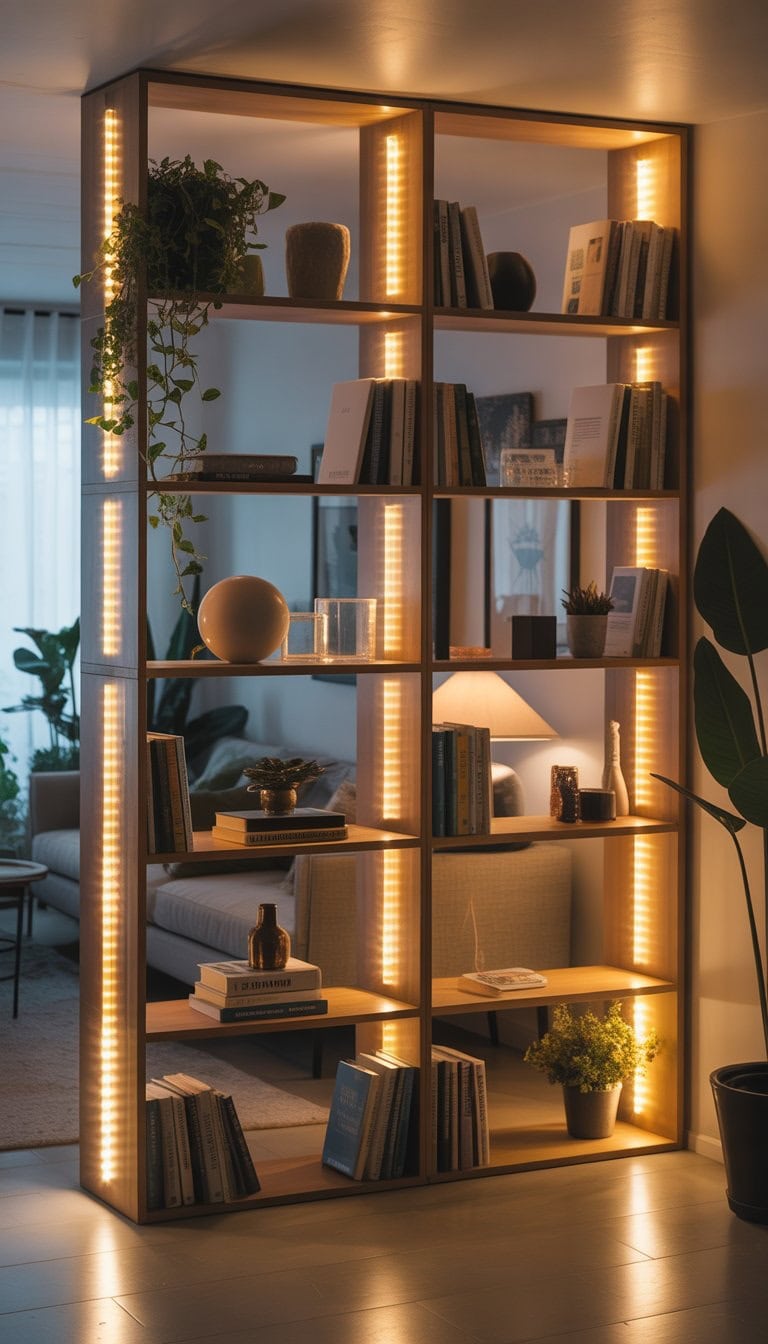
I love how adding LED strip lights to Ivar shelves can make a space feel cozy and modern at the same time. The soft glow shines through and brings out the beauty of anything I put on the shelves.
These strips are easy to install. I just stick them under or behind the shelf edges, and then plug them in. They hardly show, so the look stays clean and simple.
When I want to create a special mood, I can use different colors or dim the lights. This little upgrade turns my room divider into a calming spot in the house. For step-by-step tips, I find this DIY LED shelf lighting guide really helpful.
Use baskets and boxes on IVAR shelves to hide clutter and maintain neatness
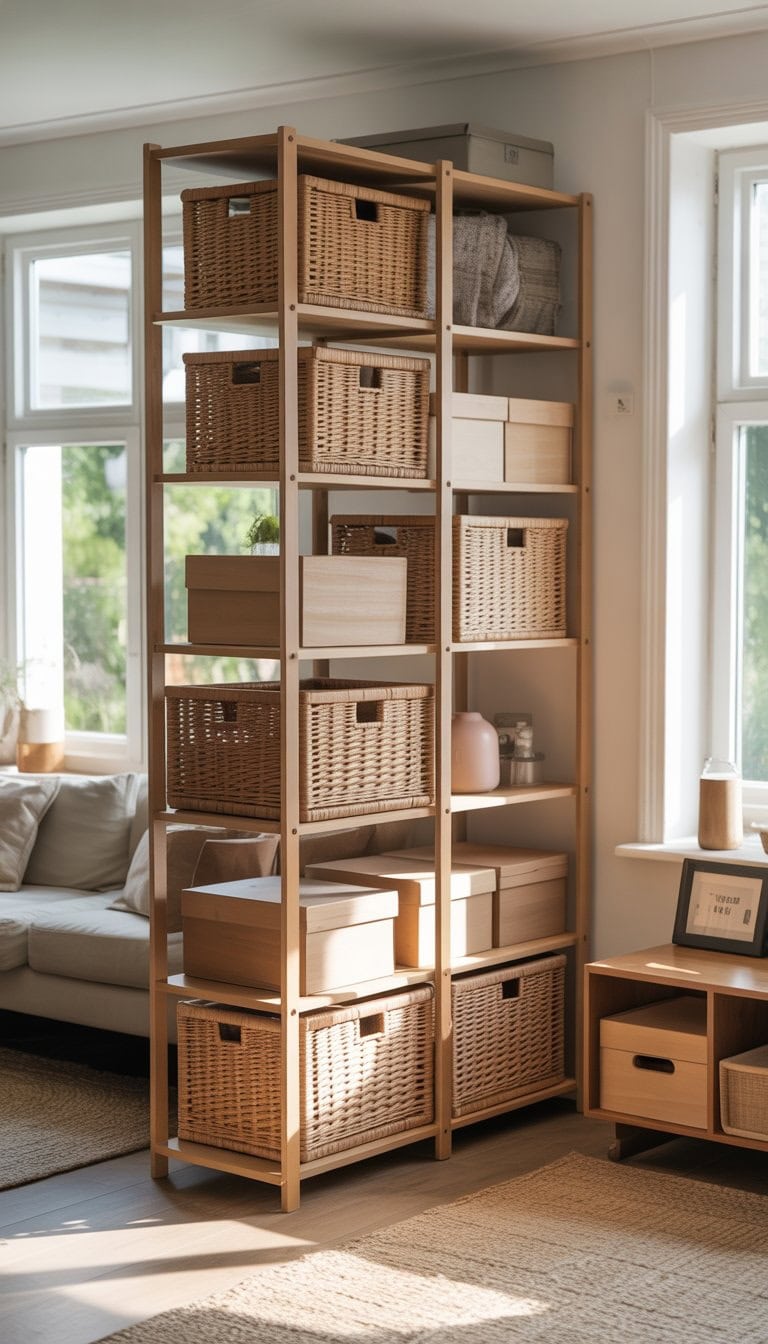
I find that baskets and boxes are a game changer for keeping my IVAR room divider looking tidy. They fit perfectly on the shelves and help me hide anything I don’t want on display, like old magazines or stray cords.
It feels good to have an organized space without much effort. When I use matching or coordinated baskets, the divider looks even more stylish.
I can easily swap them out or rearrange things whenever I want a new look. Others use this trick too, and it’s great for both small and large rooms.
This simple idea helps me keep my living area neat, even on busy days.
Cut down IVAR sections to build a low-profile divider for open spaces
When I want to create a subtle break in a large room, I like to cut down the IVAR shelving sides. Making the IVAR units shorter keeps a space feeling open, but still gives enough separation.
I find a low-profile divider works especially well in rooms with lots of light. It keeps views clear and lets you define areas without closing things in.
I use a saw to trim the IVAR sides, then sand down the edges for a smooth finish. I can leave the natural wood or add a quick stain or paint for a clean look.
This method is simple and budget-friendly. It gives me flexibility to make the divider as long or short as the space needs.
Install hooks on the sides to hang accessories or small items.
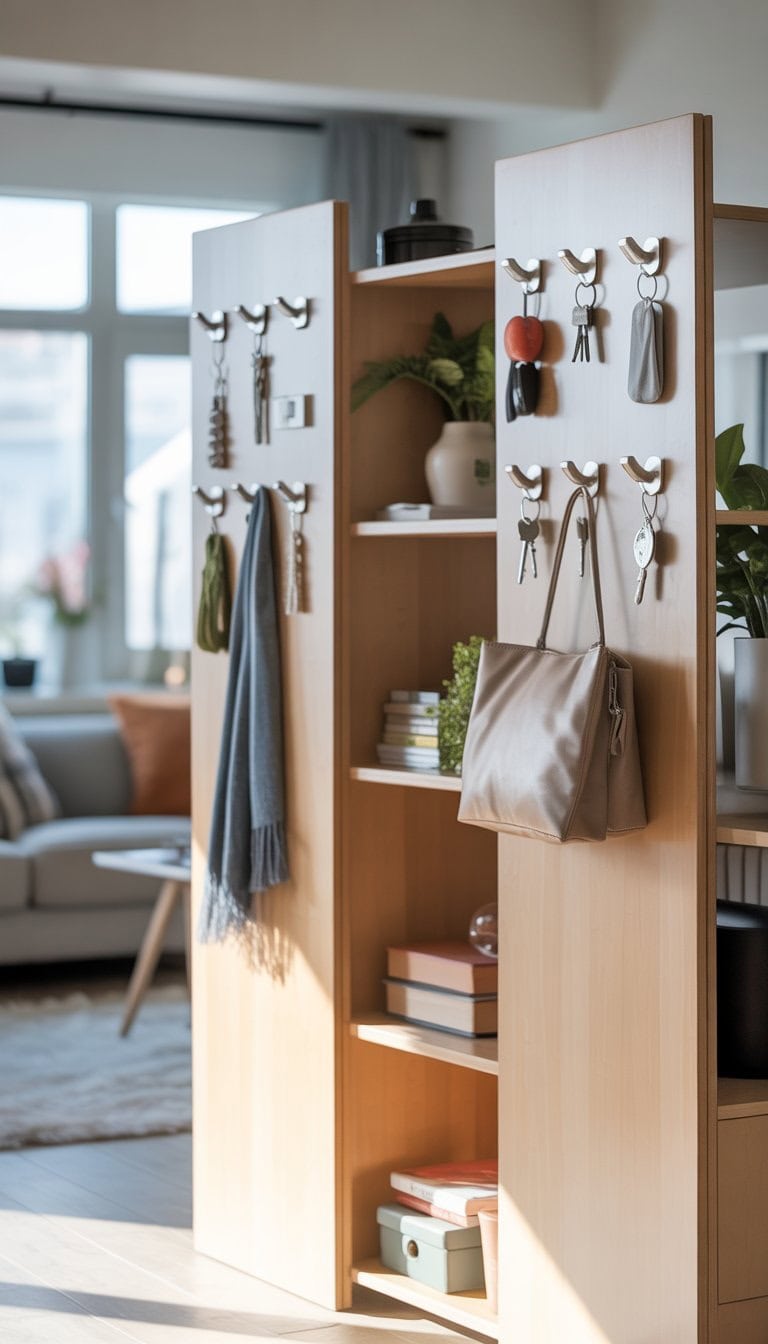
I love adding hooks to the sides of my IKEA IVAR divider. It’s such a simple upgrade, but it makes a big difference in how I use the space.
I find that small hooks are perfect for keys, hats, masks, or reusable shopping bags. When I walk in, it’s so easy to just hang up my stuff.
Sometimes I use S-hooks or even fun decorative ones. The sides of the IVAR shelf give me plenty of vertical space, so I don’t have to worry about clutter.
It’s also great for hanging baskets or little pouches for small items. This quick change really helps me stay organized and makes my room divider more useful every day. If you want more ideas, check out some easy IVAR divider hacks and ideas.
Mix open and closed storage on the divider for visual interest
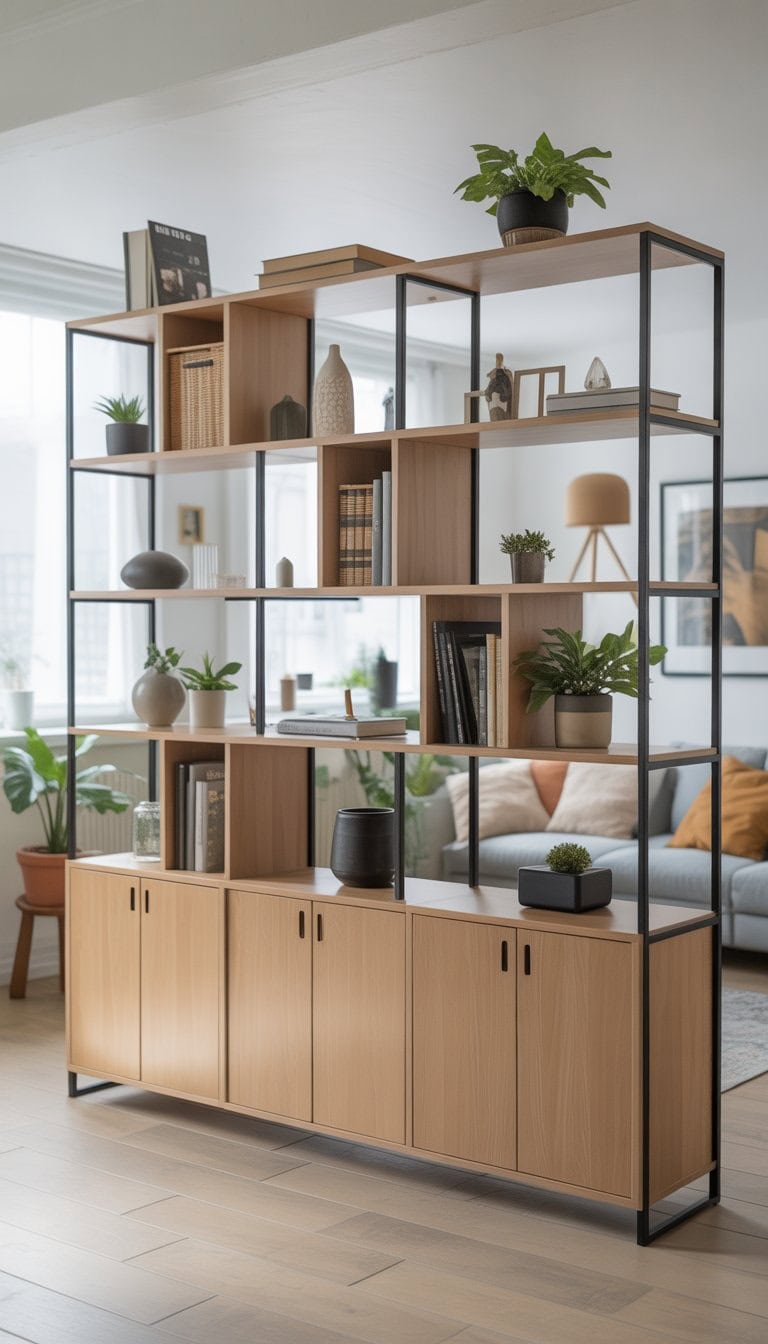
When I make a room divider with the IKEA Ivar, I like to mix open and closed storage. This keeps the space feeling light while adding places to hide clutter.
I use open shelves to show off things I love, like books, plants, or a vase. Then I add closed cabinets or boxes so I can tuck away anything I don’t want on display.
The mix makes my divider feel balanced and interesting. I can change what’s on the shelves easily, which keeps the look fresh. If you want more inspiration, I found some clever examples of this idea in these Ikea Ivar room divider hacks.
Apply decorative wallpaper on the back panel for a patterned backdrop.
I like to add personality to my room dividers with decorative wallpaper. It’s a simple update that instantly brings color and fun patterns to the Ivar’s plain back panel. If I have some leftover wallpaper from another project, this is the perfect spot to use it.
I measure the panel, cut the wallpaper to fit, and stick it on. Sometimes I choose bold, geometric prints, but soft florals can look just as nice. This method is budget-friendly and easy for anyone to try.
Wallpaper makes my divider feel like a real design feature, not just a piece of furniture. It changes the mood of the whole space. For more ideas on using wallpaper with Ivar dividers, I often find inspiration from creative DIYs online.
Combine IVAR with KALLAX cubes for diversified storage options.
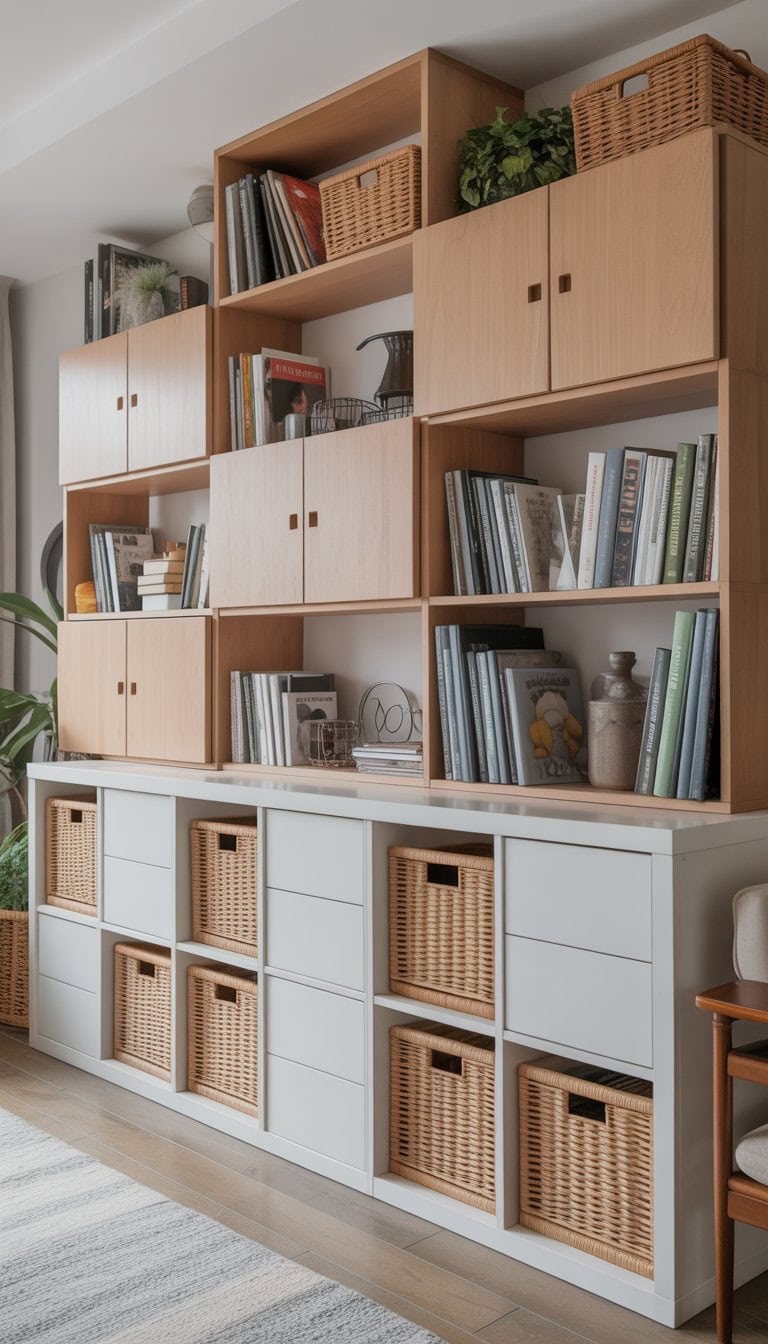
I like using the IKEA IVAR system, but sometimes I need extra storage that feels fun and easy to access. That’s when I bring in KALLAX cubes. The open shelves on the KALLAX work great for books, baskets, or display pieces.
Pairing these two together helps me split a space and organize at the same time. I can put closed items in the IVAR and leave the open KALLAX shelves for things I use every day. It also looks stylish and keeps everything tidy.
What I enjoy most is the flexibility. If I want to change things, I can move the KALLAX cubes or even add wheels for mobility. For more ideas, you can check out how others transform KALLAX units with casters and back panels.
How To Choose The Right IKEA IVAR Pieces
I’ve seen how much the right choices can change the function and look of any divider project. Picking the best IVAR pieces starts with knowing what you need and ends with a style that fits your space and life.
Assessing Space and Storage Needs
First, I always measure my space carefully. It’s important for me to know the exact width, height, and depth I can use for my IVAR divider. I grab my tape measure and leave room for opening doors, easy passage, and even airflow.
Next, I think about how much storage or display I need. Do I want open shelves for showing off plants and books? Or closed cabinets to hide clutter? Here’s a quick checklist I follow:
- How tall should my divider be?
- Will it divide a big or small room?
- What do I want to store or display?
- Do I want it movable or fixed?
I also consider family needs. If I have pets or small kids, cabinets with doors keep things safer than open shelves. Flexibility matters to me: I sometimes stack two IVAR units or add extra shelves later if my needs change. For specific ideas, I often check out IKEA room divider hacks for inspiration.
Selecting Materials and Finishes
When picking materials and finishes, I like to match my IVAR pieces to my room’s style. The classic pine look fits many homes, but IVAR can also look modern after painting or staining. I sometimes sand the wood for a smooth finish before applying color.
Here’s what I use to decide:
| Finish Type | Best For | My Tips |
|---|---|---|
| Natural | Minimal, Scandi styles | Oil or clear varnish for warmth |
| Painted | Colorful, bold spaces | Use primer; try trendy colors |
| Stained | Traditional, cozy feel | Test stain on scraps first |
Hardware is another key choice. I sometimes swap the standard knobs for brass or black handles. Sometimes I add baskets or insert boxes for extra storage.
For durability, I always use a good sealant, especially if my divider is near windows or in a kitchen. My advice is not to rush the finishing. A little detail work helps my IVAR divider last and look great. For more visual examples, I like browsing Pinterest’s IVAR room divider hacks.
Styling And Customization Tips
When I hack an IKEA IVAR into a room divider, I always make sure it feels personal and fits the look of the space. The right colors and small design details help turn any basic frame into something much more stylish.
Color and Paint Inspiration
Adding color is the fastest way I change the vibe of my IVAR divider. I like to use bold paint shades like deep greens, navy blues, or soft pastels for a playful feel. If I want something modern, I’ll go with matte black or soft white.
Sometimes, I use two tones by painting the frame one color and the panels another. For texture, a light wood stain brings out the natural grain, while chalk paint gives a soft, velvety finish. I always sand lightly before painting so the finish goes on smooth and lasts longer.
Here’s what has worked for me:
| Finish | Effect |
|---|---|
| Matte paint | Modern/Minimalist |
| Pastel paint | Playful/Youthful |
| Wood stain | Natural/Warm |
| Chalk paint | Soft/Velvety |
Painting doesn’t just improve looks — it also protects the wood. I choose nontoxic paints if the divider will go in a kids’ room or bedroom.
Adding Accessories and Decor Elements
For even more style, I add accessories that make the divider unique. Hanging small shelves on the divider gives me space for little plants, books, or keepsakes. Sometimes, I attach hooks or pegs to hang up hats, bags, or even a string of LED lights.
If I need some privacy, I’ll add fabric panels, woven rattan, or even cane webbing to the open spaces. This gives the divider a cozy, custom feel. Clips or small command hooks work well if I want the accessories to be removable.
When I want to display photos or notes, I use clipboards or pinboards attached to the slats. A string of fairy lights or a strip of LED lights also helps change the mood in the room, especially at night.
With a few easy changes, my IVAR divider always feels like it was made just for my home. For more creative inspiration, I look at other IKEA room divider hacks and see what ideas fit my style best.
Frequently Asked Questions
I love working with the Ivar series because there are endless ways to transform simple shelves into stylish room dividers. Over the years, I’ve found smart tweaks that boost both looks and functionality—especially if you’re working on a budget or in a small space.
How can you add a personal touch to an Ivar room divider?
I find that painting the Ivar in a bold color or even using two tones can make a huge difference. Swapping in patterned fabric or hanging art between shelves gives each divider its own personality.
Adding hooks or small shelves lets me display photos, plants, or trinkets that reflect my style. It really helps the divider feel like it belongs in my home.
What are some creative uses for the Ivar shelves in small spaces?
In my small apartment, I’ve used Ivar as a bookshelf, a plant stand, and a clothes organizer—all in one. Turning the shelves sideways creates more separation while still offering storage for bins and boxes.
I’ve also seen people use them as a headboard or a place to hang lightweight baskets for quick access to daily items. For more ideas, I recommend checking out these room divider hacks.
How do you stabilize an Ivar unit when using it as a room divider?
To keep my divider steady, I attach it to the ceiling or the wall with brackets whenever possible. If I want it free-standing, I use wider feet or attach castors with locking wheels to increase stability.
Adding weight to the bottom shelves with books or baskets also helps prevent tipping. There’s a helpful discussion with tips about stability on this forum thread.
Can you suggest budget-friendly ways to beautify an Ivar room divider?
I often use leftover paint to give my shelves a new look. Adding fabric panels or rope backing is an affordable way to add privacy and style—scrap fabrics from other projects work great for this.
Reusing hardware or handles from old furniture can also give a custom feel without much cost. You’ll find more inspiration in these Ivar divider ideas.
What are some clever hacks for enhancing the functionality of an Ivar divider?
I maximize space by installing hooks and adding baskets on the sides of the divider. If I need extra storage, I hang wire mesh or magnetic boards for notes and mail.
Putting castors on the bottom lets me move the divider whenever I need to reconfigure my space. For more inventive ideas, check out these Ivar cabinet hacks.
How can you integrate Ivar room dividers into open floor plans?
I like to use Ivar units to gently mark out work, dining, or lounge areas without putting up solid walls. Adding fabric or mesh panels allows for some privacy while keeping the space light and airy.
I’ve found that aligning two or three Ivar shelves side by side gives a custom look that breaks up an open room just enough, while still letting in natural light.