Sometimes I look at a blank wall in my home and instantly imagine how a collection of my favorite photos could turn it into something special. There’s something truly heartwarming about seeing snapshots of unforgettable moments, beloved faces, and beautiful places from my life every time I walk into a room. Photo walls let me share my story in a creative way that’s totally unique to my style.
Bringing my memories to life on my walls not only makes my space feel more personal, but also inspires me every day. Whether I want my photo wall to be bold and lively or calm and simple, arranging my pictures opens up endless possibilities for what my home can become. I can’t wait to show you some of the best ideas I’ve found for making any wall a real reflection of who I am.
Create a symmetrical grid layout for a clean, modern look
When I want my photo wall to look sleek and organized, I always go for a symmetrical grid layout. This style keeps everything balanced and gives the space a calm, tidy vibe. It works especially well if all my frames match in color and size.
I start by measuring my wall and planning out the rows and columns. Lining up each frame in a straight, even grid makes the display look sharp and professional. Even a simple row of six square frames can really stand out and look modern.
To get every frame perfectly straight, I like to use a level and measuring tape. Extra care in spacing between each picture helps bring the whole look together. I always step back to make sure everything is just right before hanging the final pieces.
Mix oil paintings with photography for visual depth

I love how mixing oil paintings with photography shakes up the look of any photo wall. The contrast between the soft look of oil paint and the sharpness of photos instantly adds visual interest. It keeps the display from feeling flat or predictable.
When I hang both together, I pay attention to frame styles and sizes. I might choose simple black frames for photos and something ornate or gold for oil paintings, or switch it up for a more eclectic vibe.
Combining these art forms lets me tell a richer story on my walls. Sometimes I’ll place a small painting next to a few black-and-white photos. Other times, I mix large, bold canvases with colorful family snapshots, adding warmth, texture, and personality to the arrangement. For more inspiration, I often browse collections of oil painting gallery wall ideas.
Use black and white frames for timeless elegance
I love how black and white frames can instantly make a photo wall look put together. Mixing these two frame colors helps highlight the photos without pulling too much attention away from them.
I often use a grid shape or an even pattern to make the display neat and modern. This trick works well for almost any style of room, from a bedroom to a hallway.
Keeping the frames simple lets the photos or artwork stand out. You don’t need to stick to only black and white photos—color pictures can look just as good in these frames.
If you want more ideas, you can see some great black and white gallery wall examples that work in both modern and classic homes. I always find these walls easy to create and even easier to change up later.
Incorporate family photos with abstract art for personal flair
When I put together a photo wall, I like to mix my favorite family photos with some abstract art. This helps the wall feel more unique and less formal. The playful shapes and colors from abstract pieces keep things interesting.
I often pick art that brings out the colors in my pictures. Sometimes, I use art that reminds me of special memories, too. Framing both styles in similar frames helps everything look connected.
It’s fun to shuffle around photo sizes and art prints for a relaxed layout. Mixing art forms brings personality to my space and turns my wall into something personal and creative. For more ideas, there are tips about blending personal photos with creative artwork in this family picture wall guide.
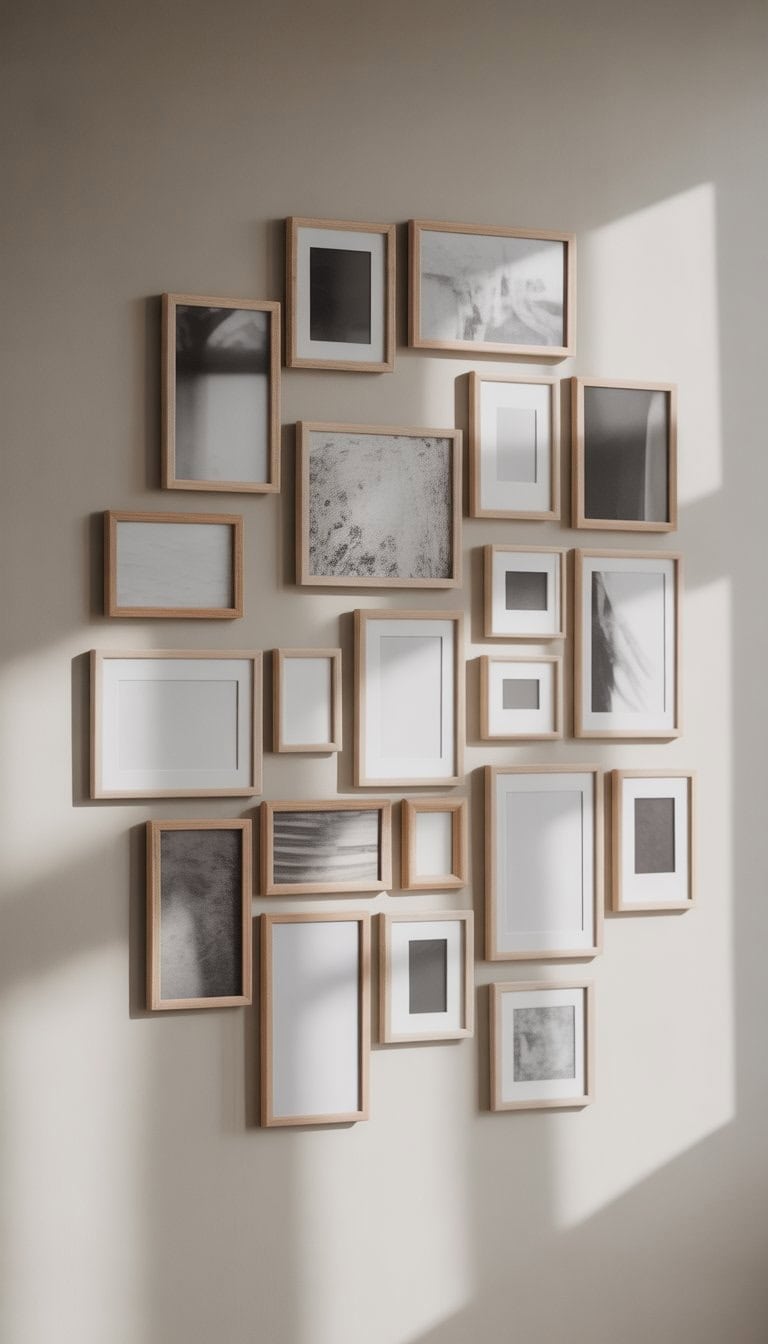
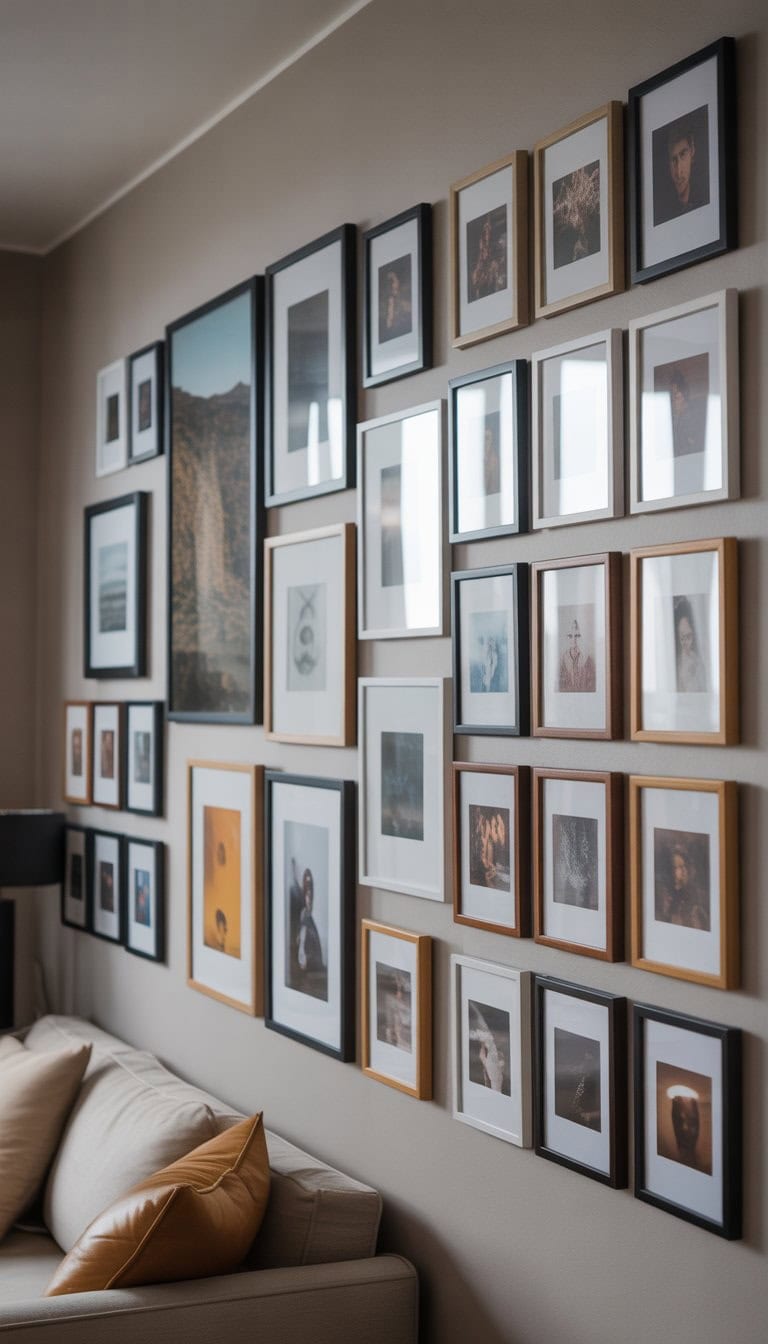
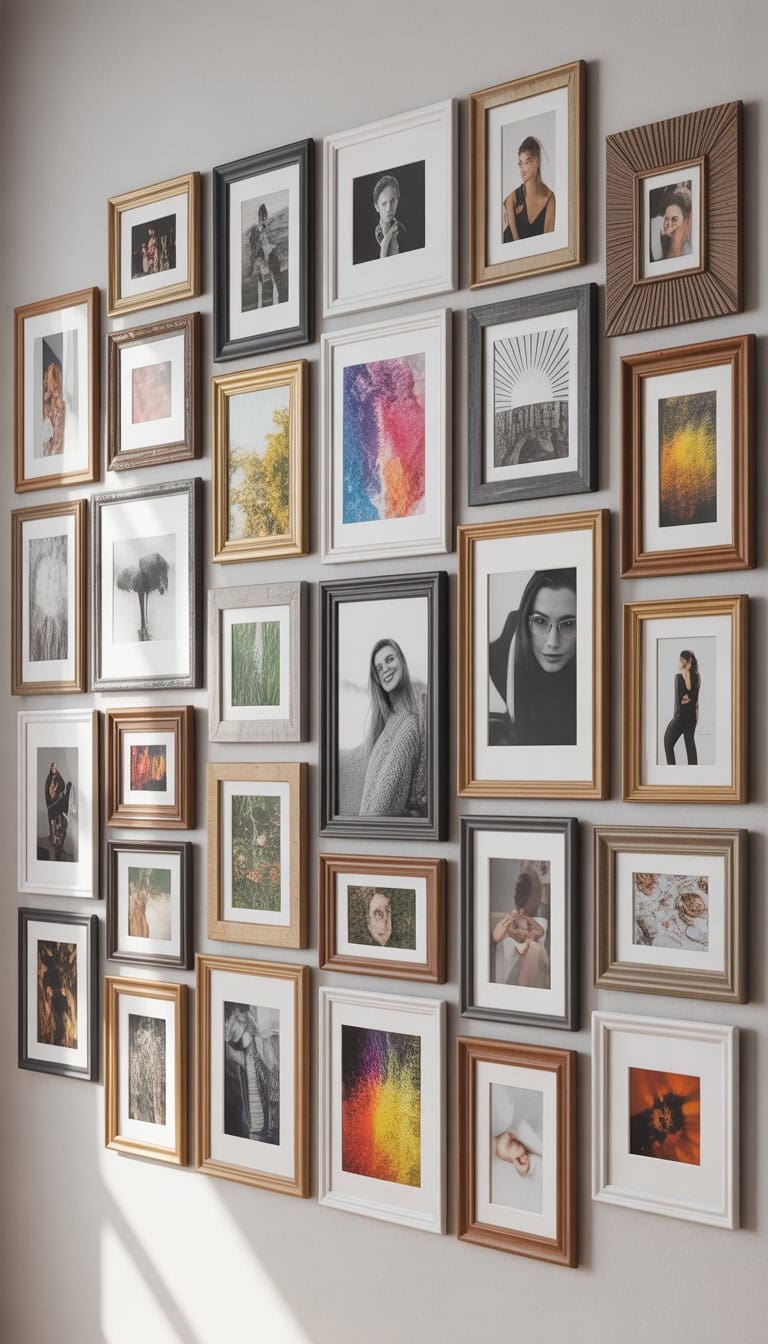
Arrange frames of varying sizes in a salon-style cluster
I love the look of a salon-style cluster for a photo wall. This idea mixes frames of different sizes and shapes. I can make my display feel interesting and lively just by playing around with the arrangement.
When I start, I like to lay out my frames on the floor first. This helps me see how each piece fits together. I often choose a mix of small, medium, and large frames to add depth and keep the eye moving.
I don’t worry about lining up edges perfectly. The mix of sizes creates a relaxed vibe that feels personal. Grouping my frames closer together keeps the collection looking unified even with a lot of variety.
If I’m not sure where to begin, I take inspiration from gallery wall ideas that show how mixing sizes can work in any room.
Include kid’s artwork to add warmth and uniqueness
I love mixing my child’s artwork into my photo wall. These pieces bring so much color and joy to my space. They make the wall feel personal and full of stories.
Even a simple doodle or painting can stand out among family photos. I usually place them in nice frames or hang them with small clips for a relaxed look.
Adding kids’ art makes my photo wall a true reflection of my family’s life. If you want more display ideas, check out these creative ways to show off your child’s masterpieces. It’s a small change that adds a touch of warmth and uniqueness every time I walk by.
Mix textures by combining canvas prints with framed prints
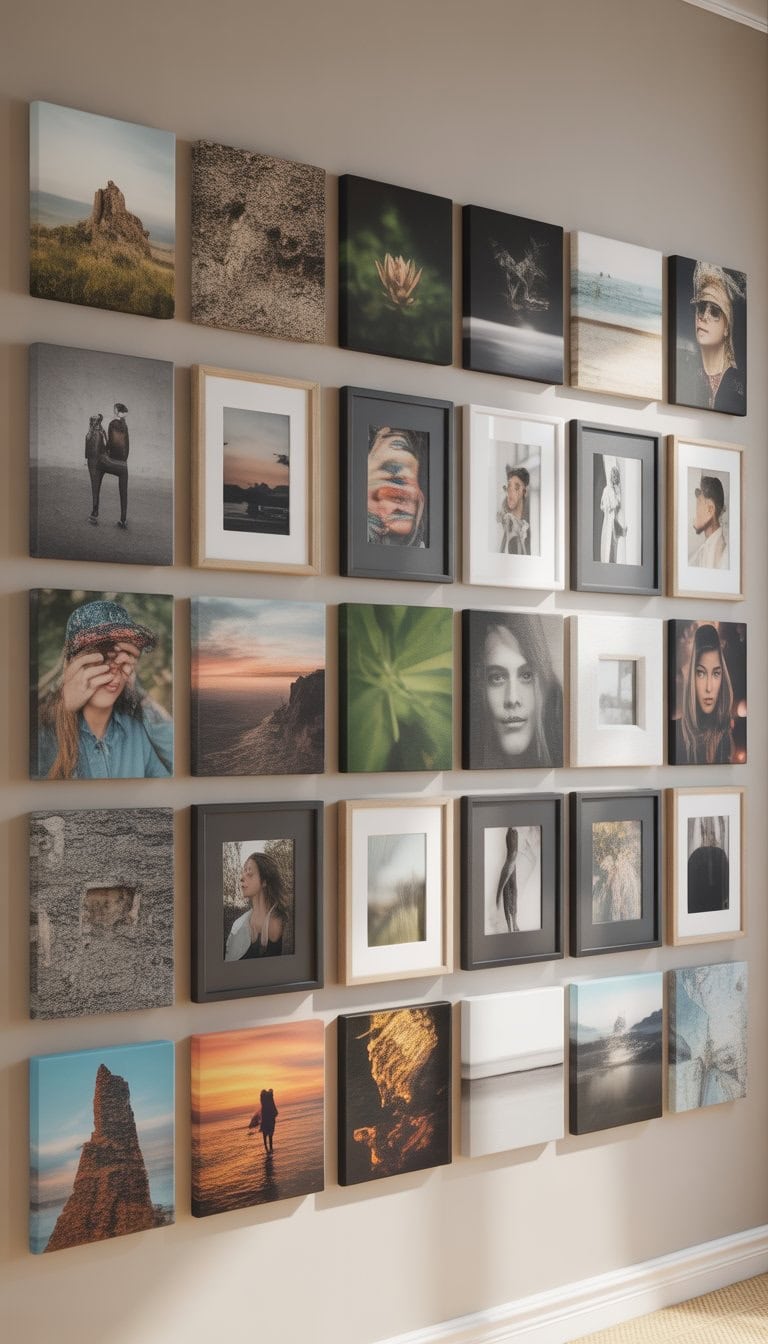
I like to mix textures by using both canvas prints and framed prints on my photo wall. Canvas prints bring a soft, textured look that adds a bit of depth to any display. Framed prints, on the other hand, give a classic, crisp style that feels polished and neat.
When I put them together, my wall looks more interesting. The different surfaces and finishes catch the light in unique ways. I’ve found that leaving some space between each piece helps every photo stand out.
If you’re not sure how to start, try mixing a large canvas print with a few smaller framed pieces. Pinterest has a lot of ideas for mixing canvas and framed photos. It keeps things relaxed but stylish—never too formal.
Create a line of pictures above seating for a cozy vibe
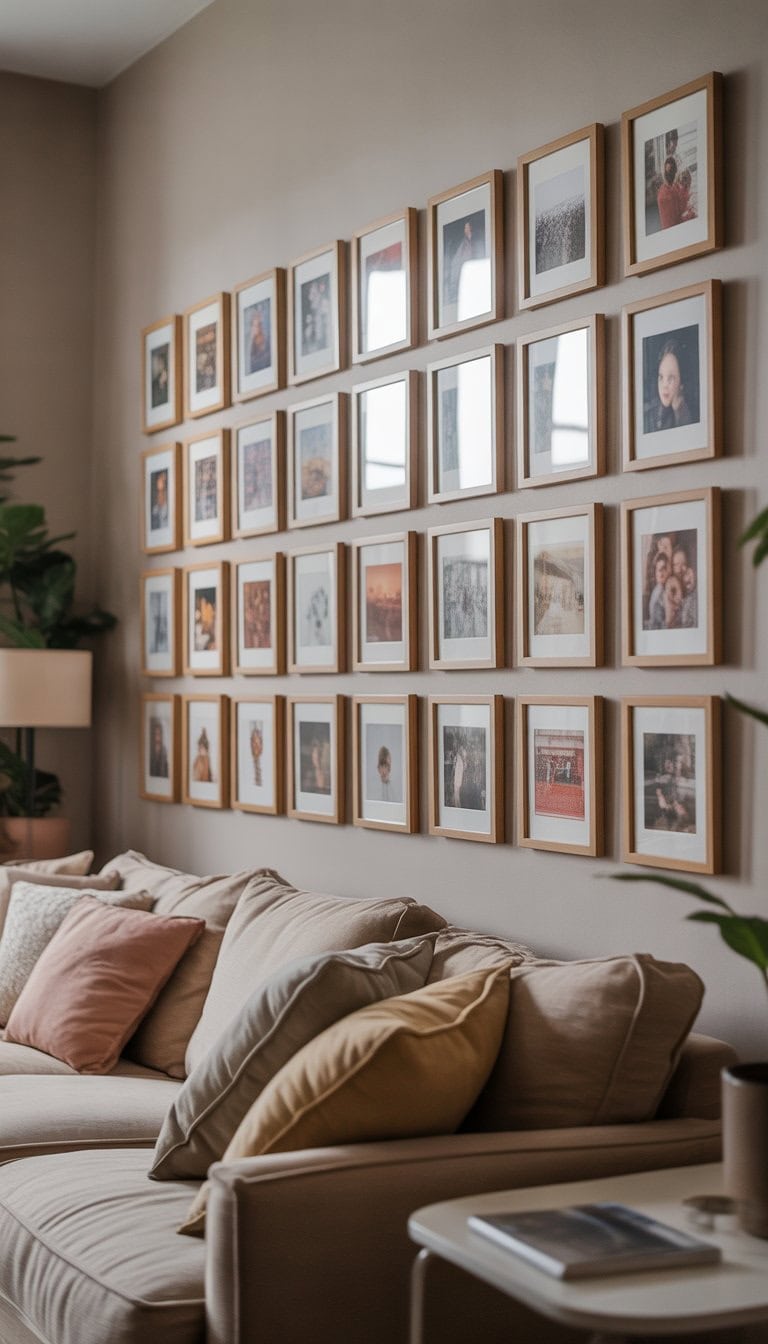
I love hanging a simple line of pictures right above my sofa or chairs. It creates a warm look and makes the space feel pulled together. Keeping photos or art in a straight line gives a clean and relaxed feel.
I usually pick frames that match my room or go for all-black or all-white frames for a classic touch. When choosing the pictures, I mix family photos, nature scenes, or even simple sketches.
Spacing each frame about two to three inches apart keeps things neat but not too crowded. If you need inspiration for how to arrange photos above a couch, there are many ideas on walls behind sofas to explore.
This look works with almost any style, and it’s easy to change the photos whenever I want a new vibe.
Use antique brass frames to add vintage charm

I love using antique brass frames because they bring a sense of history and warmth to my photo walls. The gold tones look great with both black-and-white and color photos.
Sometimes, I mix a few different frame styles and sizes to give my wall a collected feel. It looks less formal and more lived-in to me, which I enjoy.
If I find empty frames, I’ll hang them up too. Even without pictures, they add texture and interest to the display, as I saw on a Pinterest gallery wall.
Arranging these brass frames in a group helps turn my favorite memories into a simple, eye-catching feature.
Start with two large statement pieces and fill in smaller frames
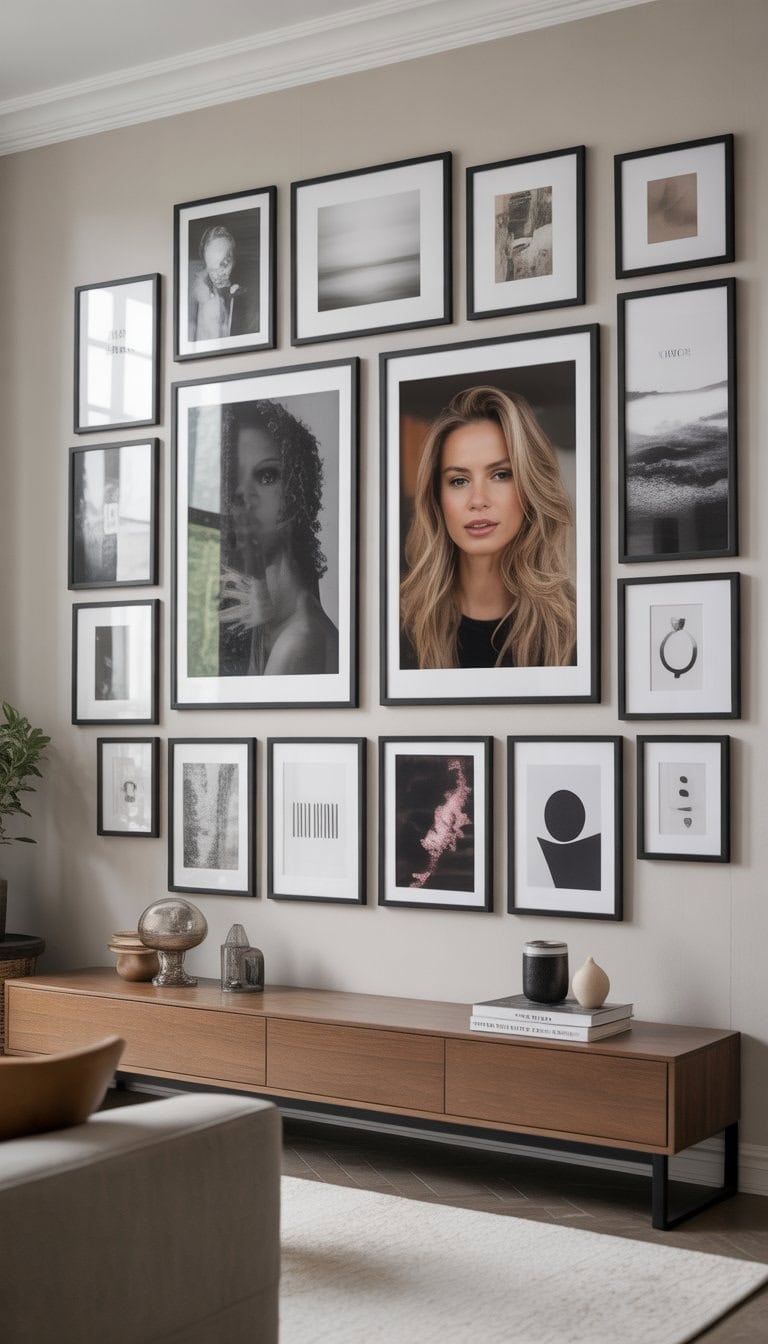
When I design a photo wall, I like to start with two big statement pieces. These large frames grab people’s attention right away and set the vibe for the whole wall. I usually place them either side by side or spaced apart to anchor the arrangement.
Next, I fill in the gaps with smaller frames. Adding different sizes makes the wall look interesting without feeling crowded. Sometimes, I mix black, white, and wood frames for variety and balance.
It helps me to lay the frames out on the floor first. I move things around until it feels right. Keeping groupings tight but not too cramped makes the wall feel pulled together. For more inspiration, I look for new ideas and layouts, like in this guide to unique photo wall ideas.
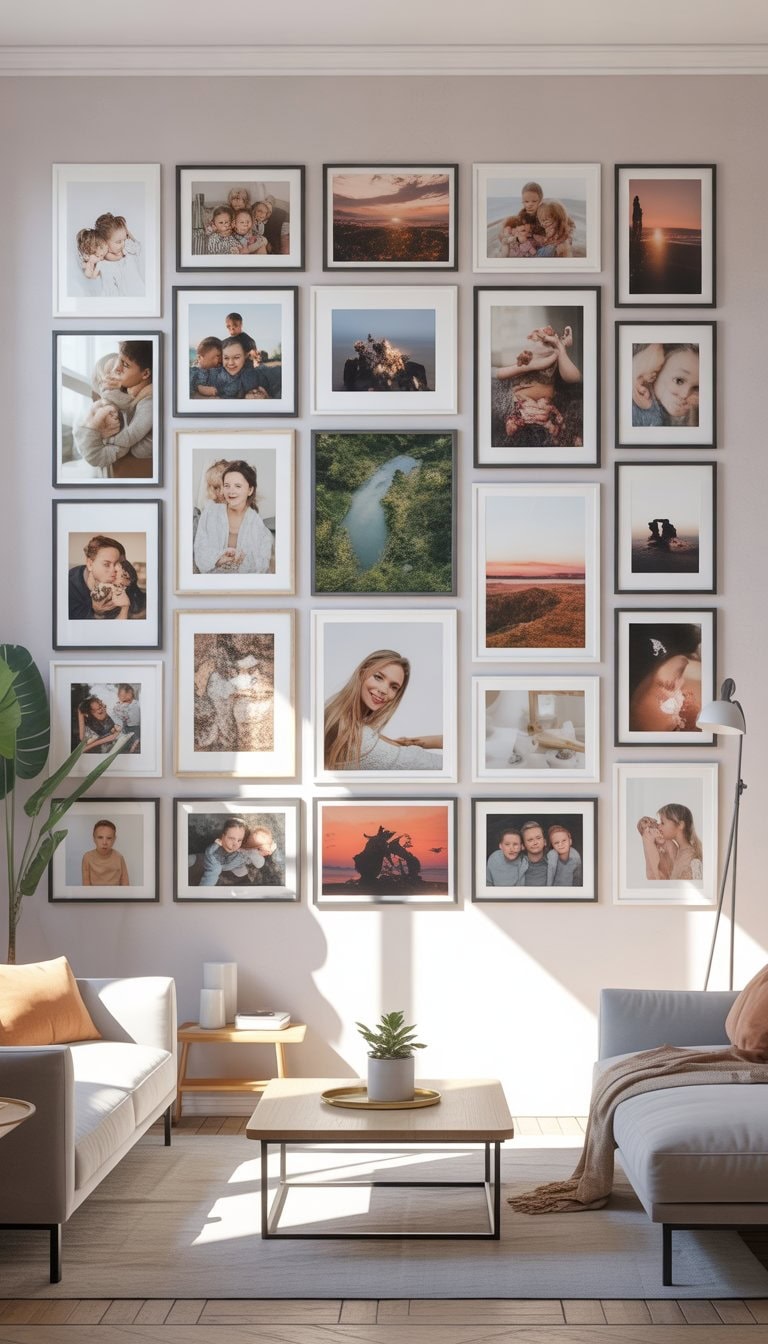
Mix portrait and landscape orientations for dynamic flow

I like to mix portrait and landscape photos when I make a photo wall. It helps the arrangement look fresh and lively.
Pairing vertical frames with horizontal ones breaks up the space. I find this keeps everything from feeling too stiff or crowded.
I usually start with a few large landscape photos, then I tuck in smaller portraits around them. This way, my eye moves naturally from one picture to another.
Adding both shapes gives more options for arranging my favorite shots. The mix also lets me fit in pictures of different sizes and moments. For ideas on how to balance frames, I sometimes check gallery wall tips.
Switching between portrait and landscape keeps my wall interesting every time I walk by. It lets my favorite memories stand out in their own way.
Use a floral backdrop behind frames for softness
I love using flowers to make a space feel calm and inviting. Adding a floral backdrop behind my photo frames gives the wall a soft look that really stands out. The flowers can be real or artificial, and both types work well.
Sometimes I go for bold, bright flowers if I want lots of color. Other times, I like gentle pastels for a lighter touch. There are plenty of creative ideas online if you need inspiration for your own flower wall backdrop.
If I don’t want to use fresh flowers, silk or paper flowers can look just as nice. A floral background makes the frames and photos pop. It brings a bit of nature indoors and helps my arrangement feel extra special.
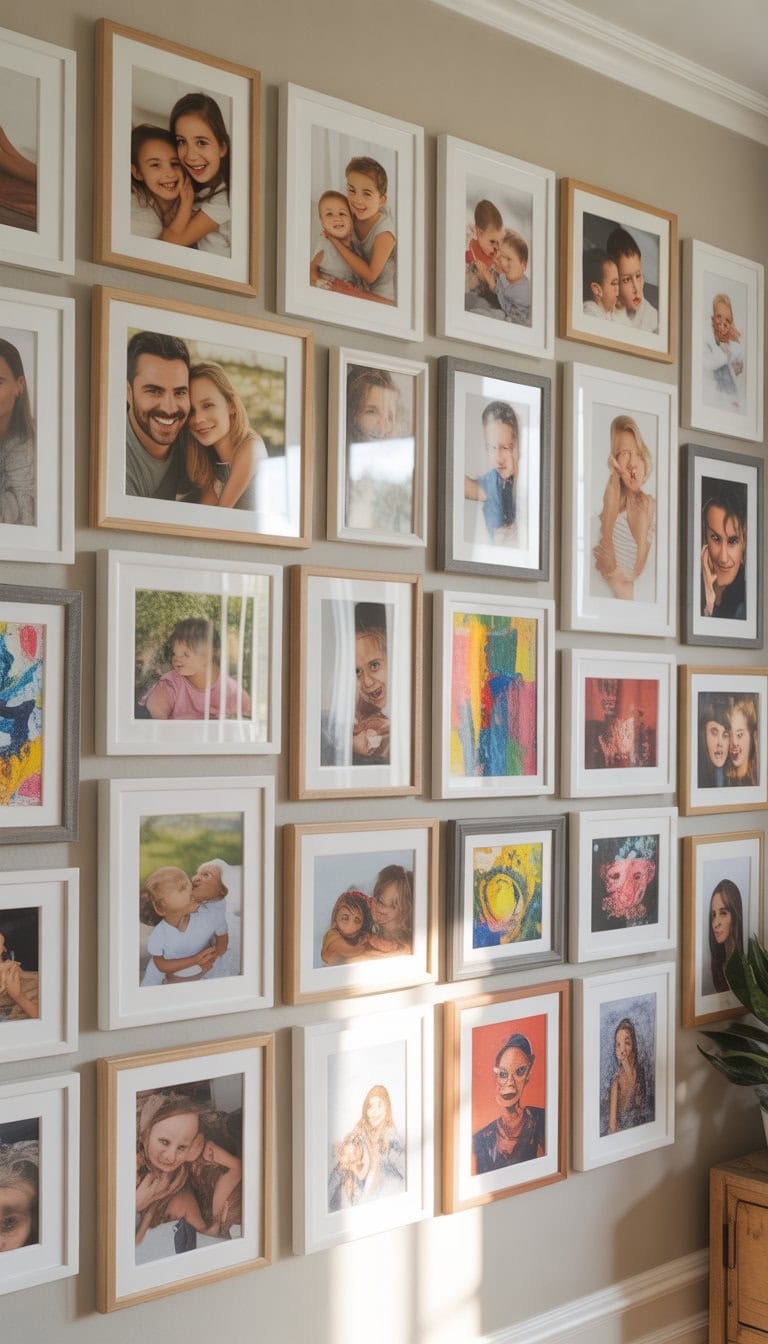
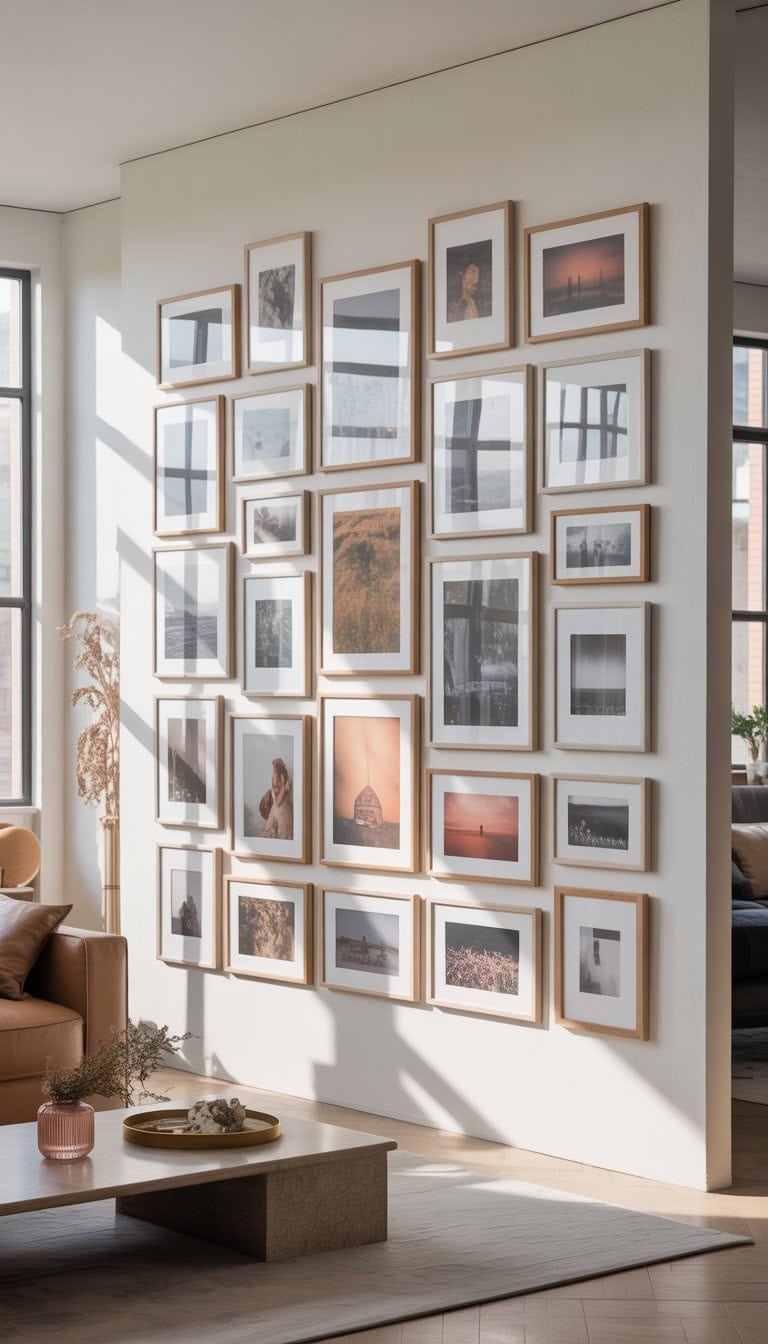
Create a mixed grid pattern balancing symmetry and movement
I like the idea of mixing order with a little freedom in my photo wall. A mixed grid pattern gives me structure, but it also lets the arrangement feel lively.
To start, I set up rows and columns like a standard grid, keeping equal spacing between frames. But I play around with frame sizes and art styles to make the look less rigid.
I might use a few large pieces in the center and smaller ones at the edges. Sometimes, I swap in a mirror or a unique frame for extra interest.
This mix helps balance symmetry and movement. It’s structured, but nothing feels too perfect. If you want more ideas and tips on arranging a modern frame wall, check out this helpful guide on frame wall arrangements.
Add 3D objects like mounted shadow boxes with photos
I like to make my photo wall feel more unique by adding some 3D pieces, not just flat frames. Shadow boxes are my favorite for this. They let me include photos and small keepsakes, like ticket stubs, dried flowers, or medals, making the wall tell a bigger story.
Creating a shadow box is simple and fun. I just pick a photo and a few small items that go with it. Then, I arrange them inside the box and hang it alongside my other frames.
Mixing shadow boxes with regular photos adds lots of interest and texture. For inspiration, I sometimes look at other people’s 3D photo shadow box displays for new ideas. This helps me make each section of my wall special.
Use white frames on a colored wall for contrast
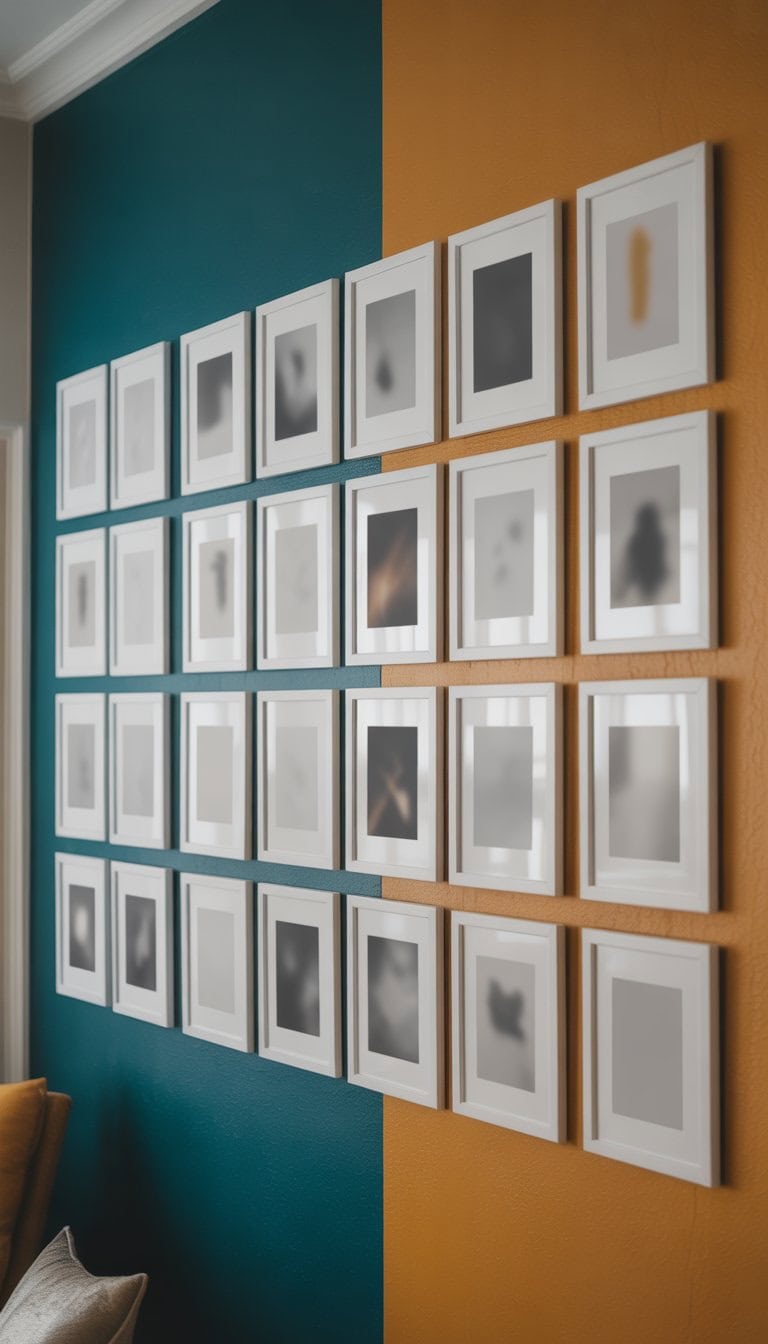
I love using white frames on a bold or vibrant wall because it instantly makes the pictures pop. The clean edges of the frames stand out against any painted background. This way, even simple photos feel more special.
Light reflects well off white, adding some brightness to the room. It makes the whole wall feel fresh and open, especially if the paint is dark or saturated.
When I arrange white frames with different sizes, it creates a fun and balanced look on the wall. It helps the photos stay the focus without being overwhelming. If you want some inspiration, there are ideas for white frame walls at Good Housekeeping and Pinterest.
Group frames by color palette for cohesion
I love how a photo wall looks when the frames share a color palette. It instantly makes the whole arrangement feel calmer and more pulled together. When I stick to matching or coordinating frame colors, my photos and art don’t have to match perfectly—they still look connected.
Sometimes I pick all black, white, or wood tones for the frames. Other times, I pick two or three colors that show up elsewhere in my room. I find this trick works whether I’m hanging family photos, art, or even keepsakes.
Choosing frames in a similar color scheme is a simple way to create a visually pleasing display. For more inspiration and arrangement tips, I check places like these creative photo wall ideas for fresh looks.
Create a yearly evolving gallery with updated photos
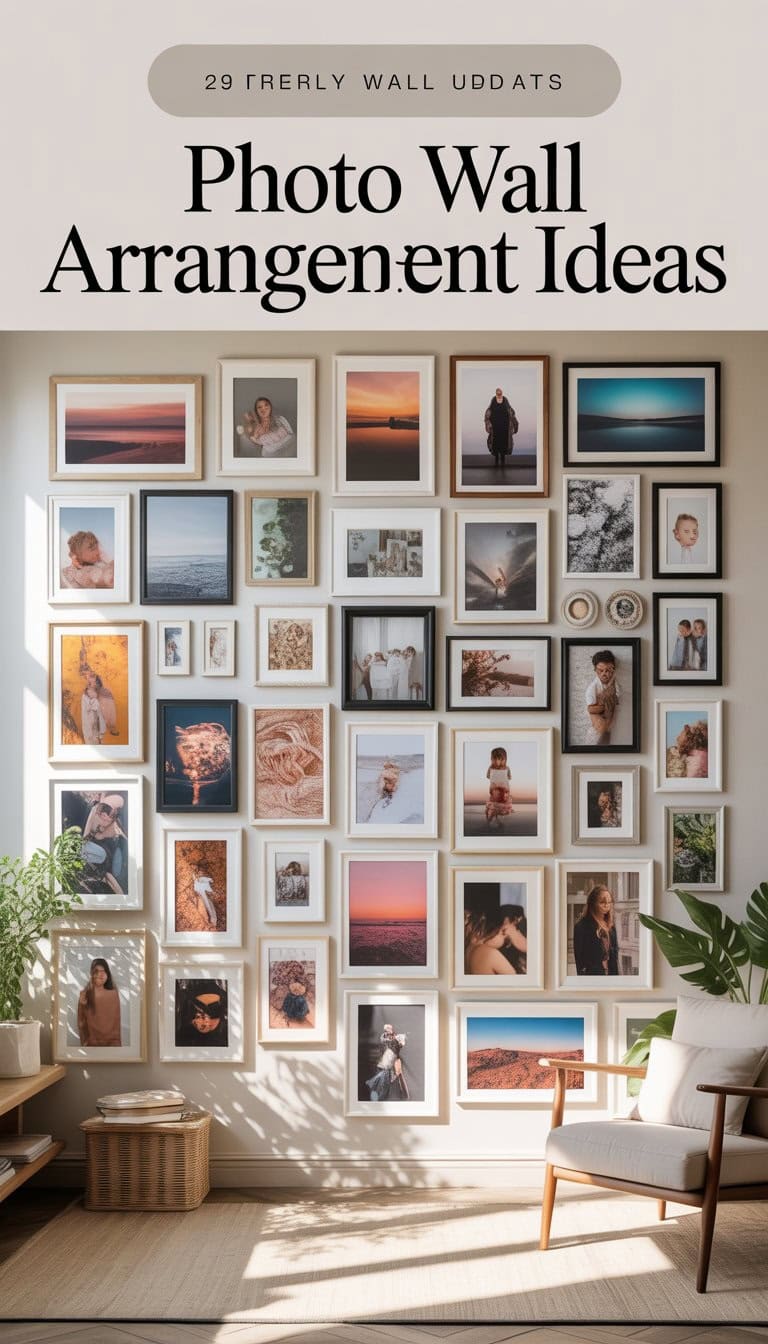
I love looking back on memories and seeing how my family grows each year. That’s why I set up a yearly evolving gallery wall in my home. Every year, I swap out the old photos and add the latest ones, making the wall a living story.
This simple change keeps the space feeling fresh. I get to celebrate moments like birthdays, graduations, and trips, right on my wall. When friends and family visit, they can see our journey—year by year.
It doesn’t take much time and makes decorating fun. I use matching frames for a clean look or mix styles if I want things to feel more casual. For inspiration, I found some helpful tips on creating a yearly couple gallery, which works great for any family or group.
Mix media types: watercolor, photographs, mixed media
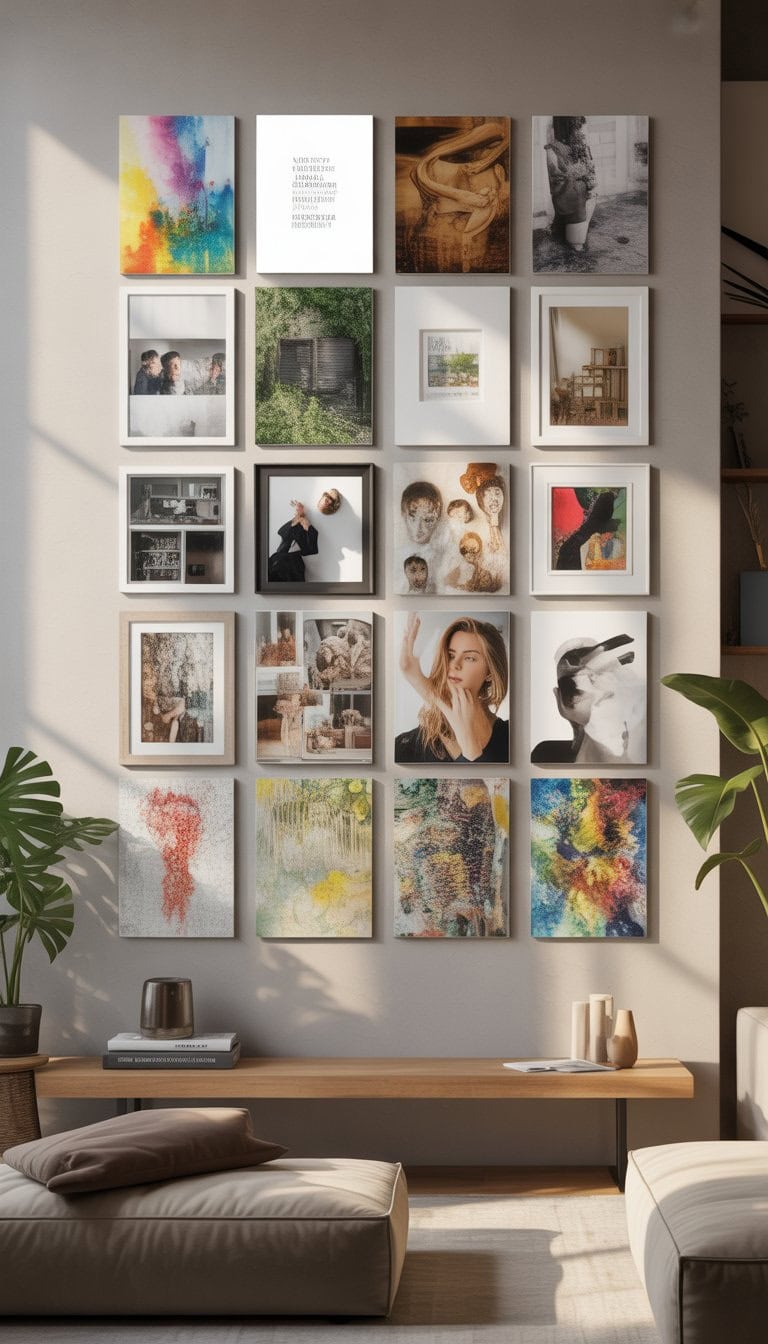
I love blending different art styles on my walls. When I mix watercolors with photographs, the space feels lively and full of personality. Watercolors add soft color, while photos keep things personal and meaningful.
I like to add in some mixed media art for interest. These pieces often include fabric, paper, or textured paint. The variety stops my wall from feeling too flat or stiff.
Changing up the media is an easy way to make my gallery wall unique. I play with frames too—wood, gold, and black—to tie everything together. For more fresh ideas, I sometimes check out gallery wall inspiration online.
Use minimalist frames paired with colorful wall paint
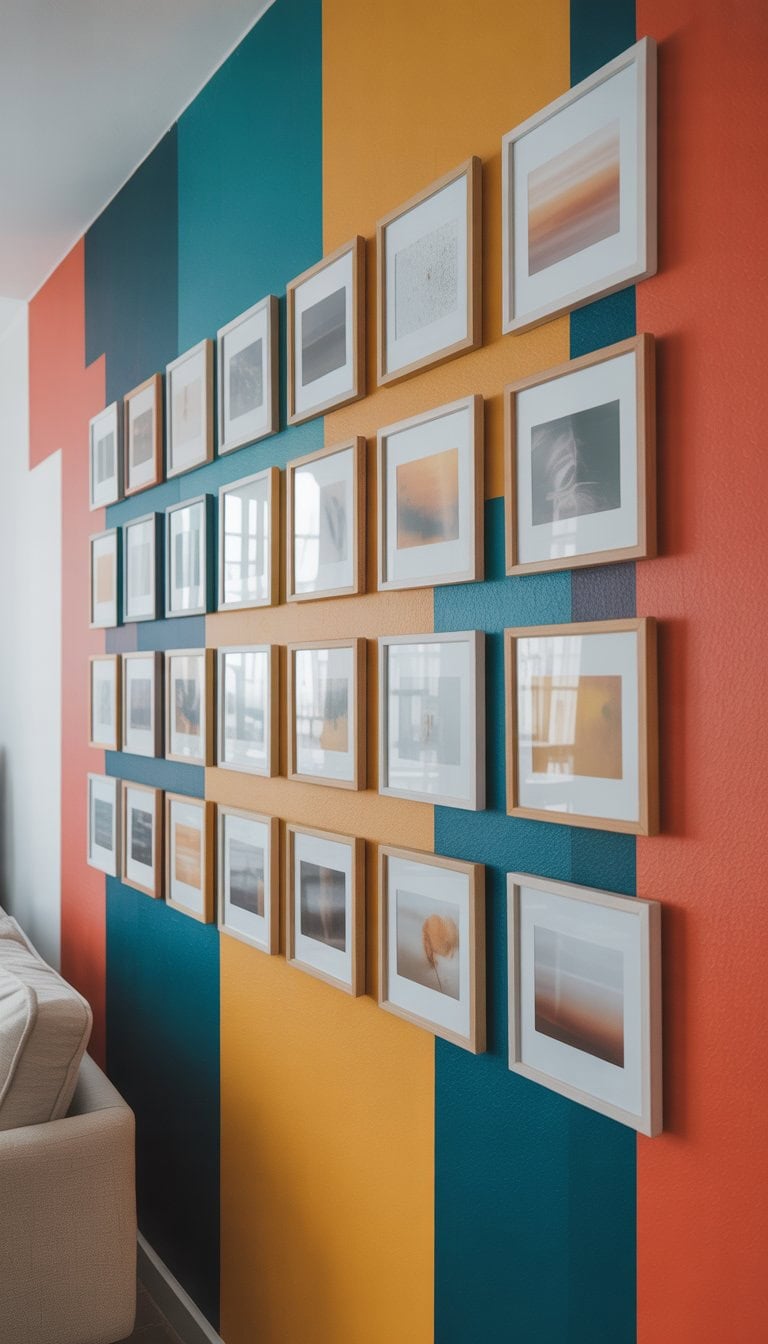
I love how simple frames can pop against a bright or bold wall color. I usually choose thin black or white frames because they don’t steal attention from the photos. Instead, the frames create clean lines that make every picture look neat and organized.
When I pick a colorful paint for the wall, like teal or mustard yellow, the artwork feels more playful. The photos seem to stand out even more, especially in a room with simple furniture.
Mixing different bright colors with these minimalist frames turns the photo wall into a real focal point. If you want a modern style, try sticking to just one color for the frames, and use the wall paint for all the drama. For ideas, I found great inspiration for frame and color combos on gallery wall guides.
Make a travel memory wall using postcards and photos
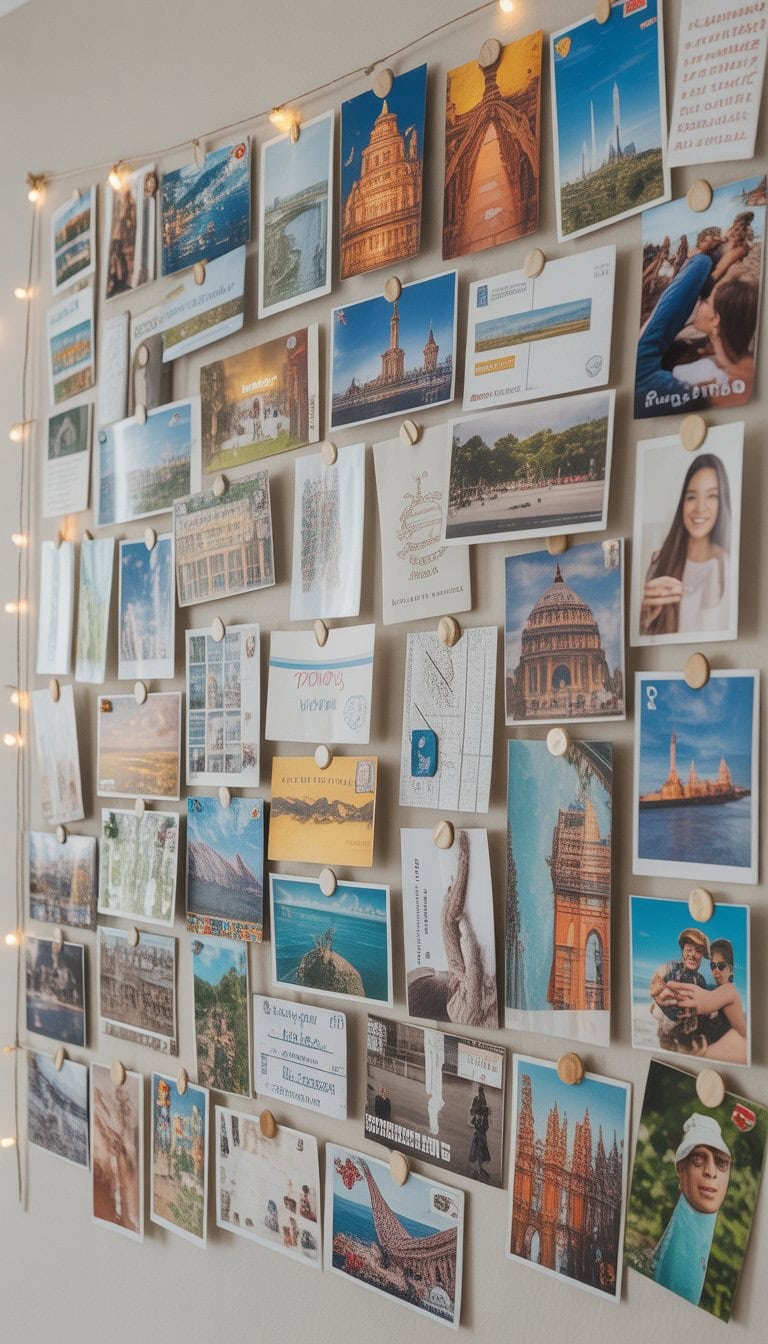
I love to bring my adventures home by creating a travel memory wall. I pick out my favorite postcards and photos from each trip and display them together. Each piece reminds me of where I have been.
I like to experiment with different layouts. Sometimes I arrange the cards around a map, tracing my travels. Other times, I make a simple grid that’s easy to add to as I explore new places.
Mixing postcards with photos adds variety and personality. Postcards show off the local style, while photos capture special moments. If you want more ideas, you can check out some clever ways people build a travel wall gallery at home.
Adding small souvenirs, like tickets or maps, helps bring the wall to life. My travel wall grows with every adventure I have.
Include inspirational quotes framed alongside photos
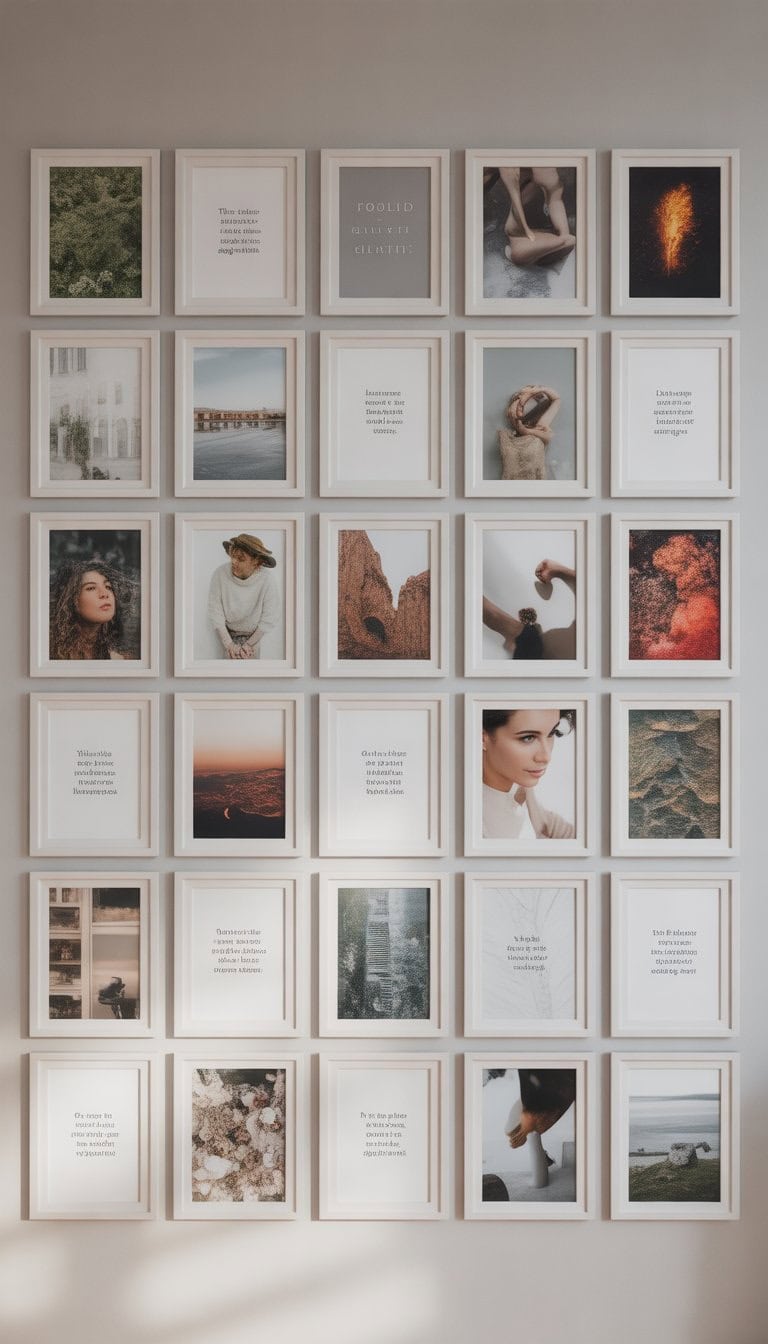
I love adding framed inspirational quotes next to my favorite photos. It brings extra meaning to my photo wall and makes the space feel positive.
When I read a quote that lifts my mood, I know it will look great in a simple frame. Mixing photos and quotes helps my wall tell a story.
Sometimes, I find unique frames with quotes already printed on them. Other times, I print out my favorite sayings to match my pictures. I’ve even seen great options for picture frames with inspirational quotes if I want something special.
By lining up happy memories with quotes I admire, my wall feels even more like mine. Friends always notice the words and ask me about them, which starts nice conversations.
Place a large central piece and radiate smaller frames outward
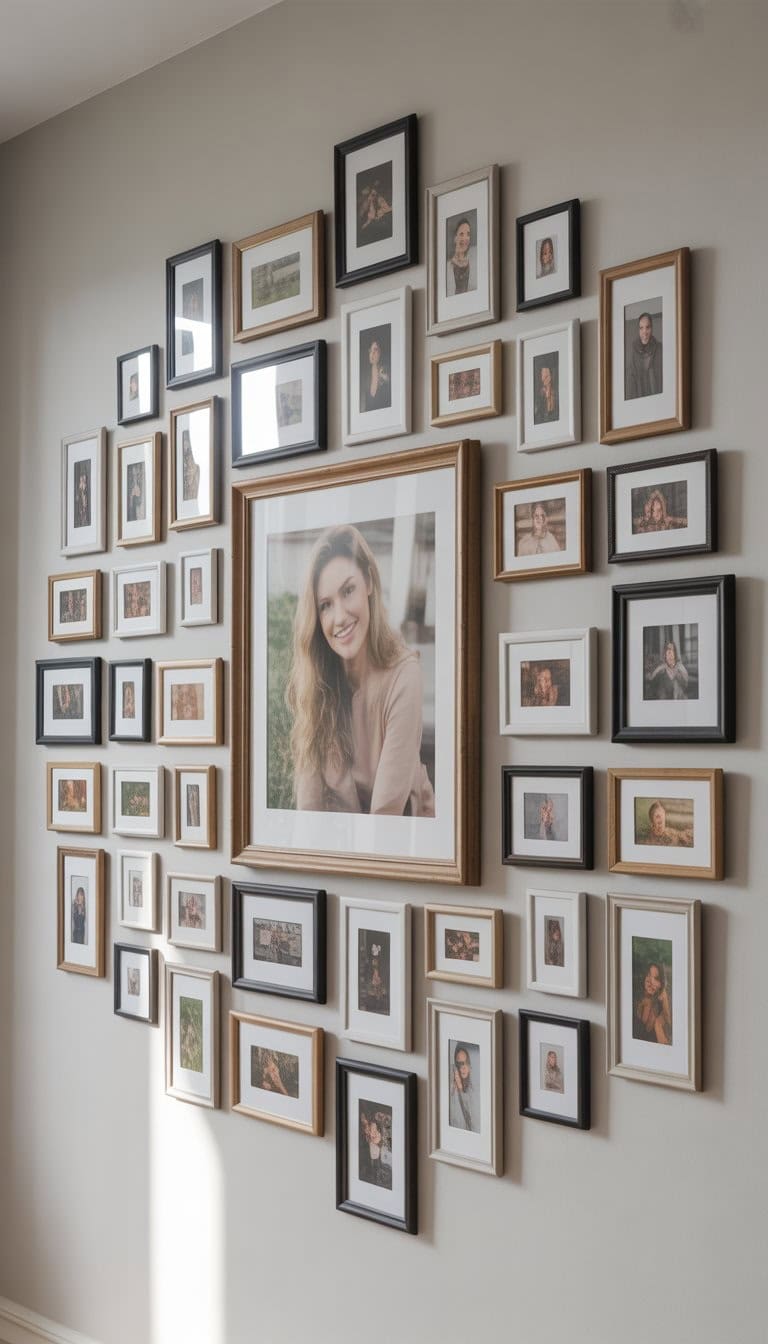
I love starting a gallery wall by choosing one big, bold piece for the center. It sets the vibe for the whole wall and really draws my eye in. Once I pick my favorite photo or artwork for the middle, everything else starts to fall into place.
Next, I begin adding smaller frames around the central piece. I like to use a mix of sizes and shapes for a look that feels playful and creative. Arranging the smaller frames around the large one helps the wall feel balanced and connected.
Sometimes, I even use different frame styles to mix things up. The most important part for me is making sure each piece has enough space to stand out. If you want layout tips, you can find more ideas for creating a gallery wall with a large center picture.
Use simple black frames paired with wooden shelves
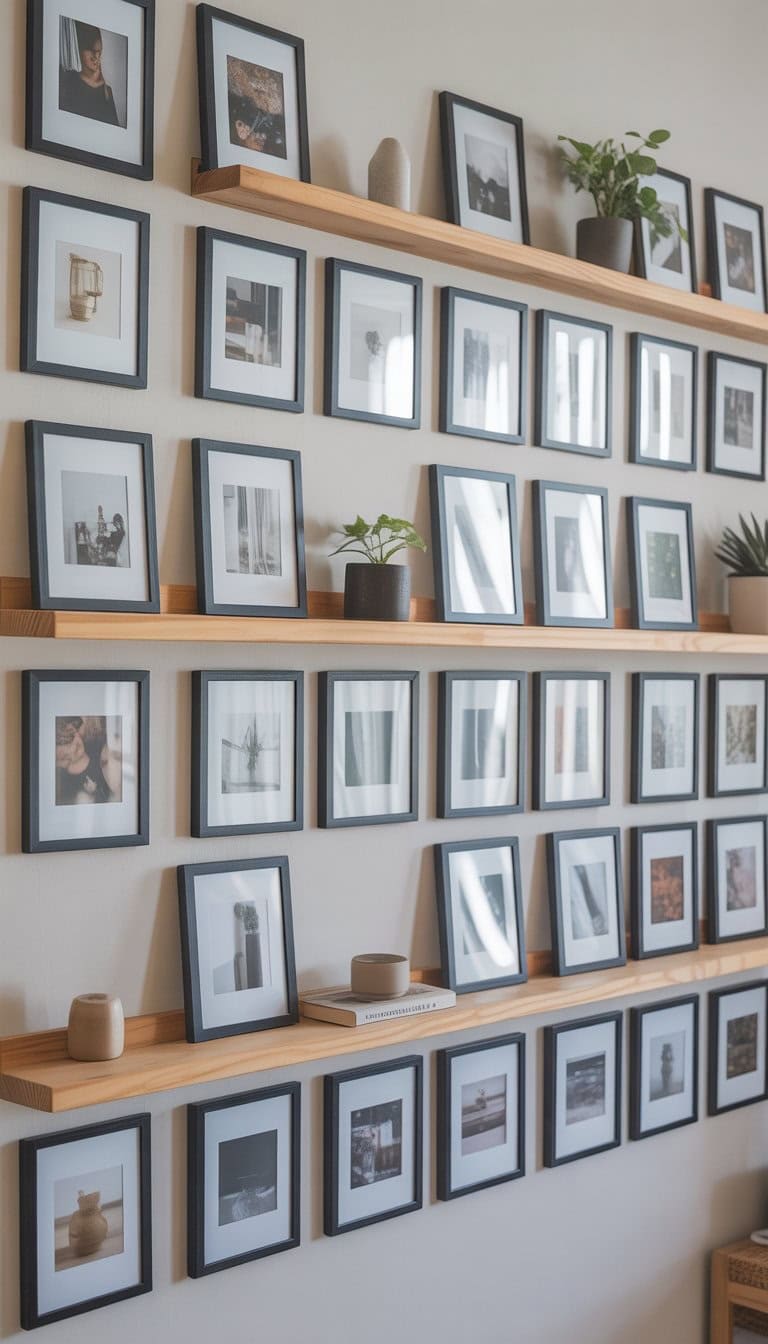
I really love how clean and modern simple black frames look on the wall. They give my photos a classic style without feeling too fancy or stiff. When I pair black frames with wooden shelves, it pulls everything together and adds warmth at the same time.
Placing a few black frames on light wood shelves makes my pictures stand out. I like breaking up the line of frames with small plants or souvenirs. This helps the display look personal and creates more interest.
Arranging black frames in different sizes keeps things from looking too perfect. It lets me switch pictures whenever I want, too. If you want more ideas, I found great examples of how black frames and shelves work well together at this gallery wall inspiration page.
Hang photos in a stairwell with a linear arrangement
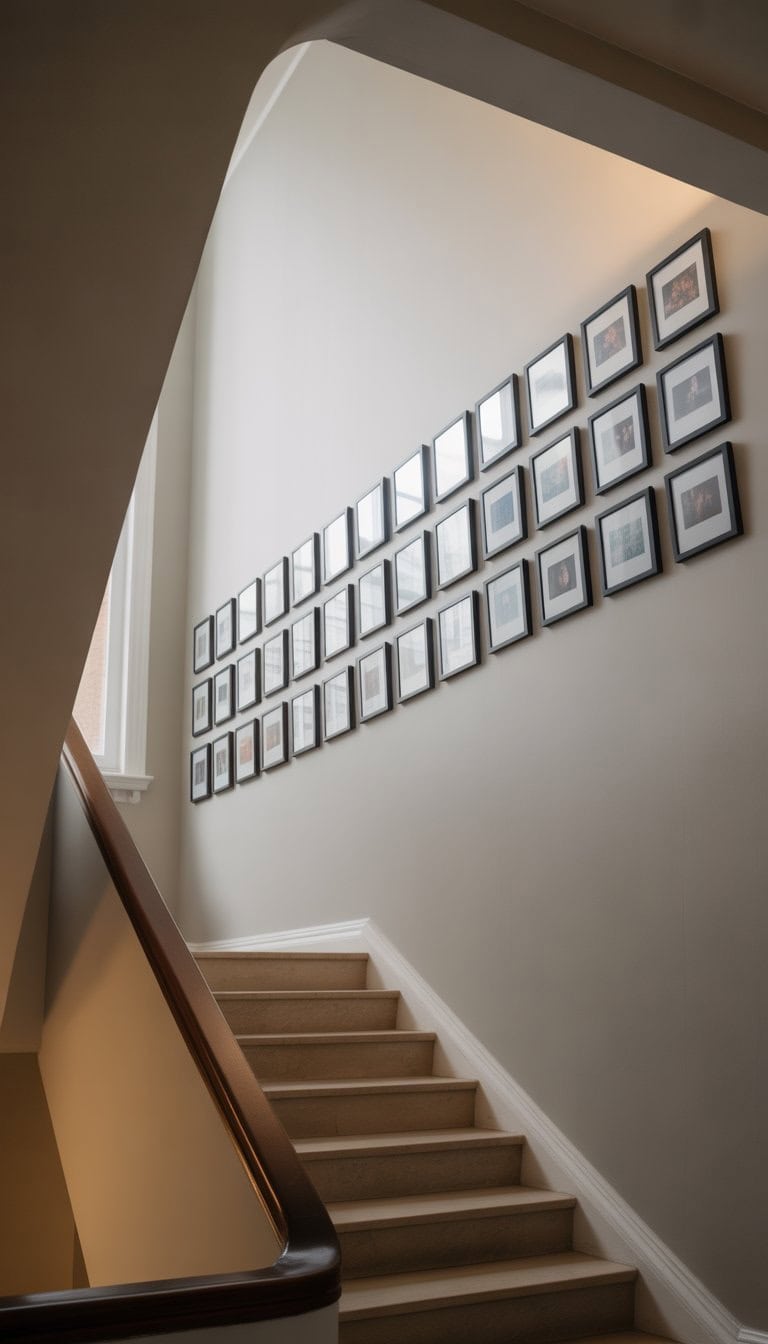
I find a linear arrangement works really well along a staircase. It gives the whole space a neat and organized look. When I do this, I try to follow the angle of the stairs as closely as possible.
I always measure the handrail or stair edge first, then mark a line at eye level. This helps make sure every picture lines up.
To keep things simple, I stick with photos that are the same size. Sometimes, I’ll mix in a few frames that are slightly larger for variety. Grouping them close together keeps everything looking connected.
If you’re not sure where to start, you can check out helpful tips for staircases from Grillo Designs. It really helps take the guesswork out of arranging photos on tricky stairwell walls.
Use mismatched frames intentionally for a boho look
When I want my photo wall to feel relaxed and creative, I use frames that don’t match. I like mixing different colors, materials, and sizes. It instantly gives my space a cozy, lived-in vibe.
I’ve found that wood, gold, and even bright painted frames all work together if I spread them out on the wall. I don’t worry if the styles are different—sometimes, that’s what makes it feel personal and collected.
If I need ideas, I look to boho frame wall inspiration online. It helps me see how other people use unique frames for a fun gallery look.
Arranging mismatched frames takes some practice, but I think the result feels free and welcoming. Each frame stands out, but together they make something special.
Frame fabric art or textile pieces within the wall gallery
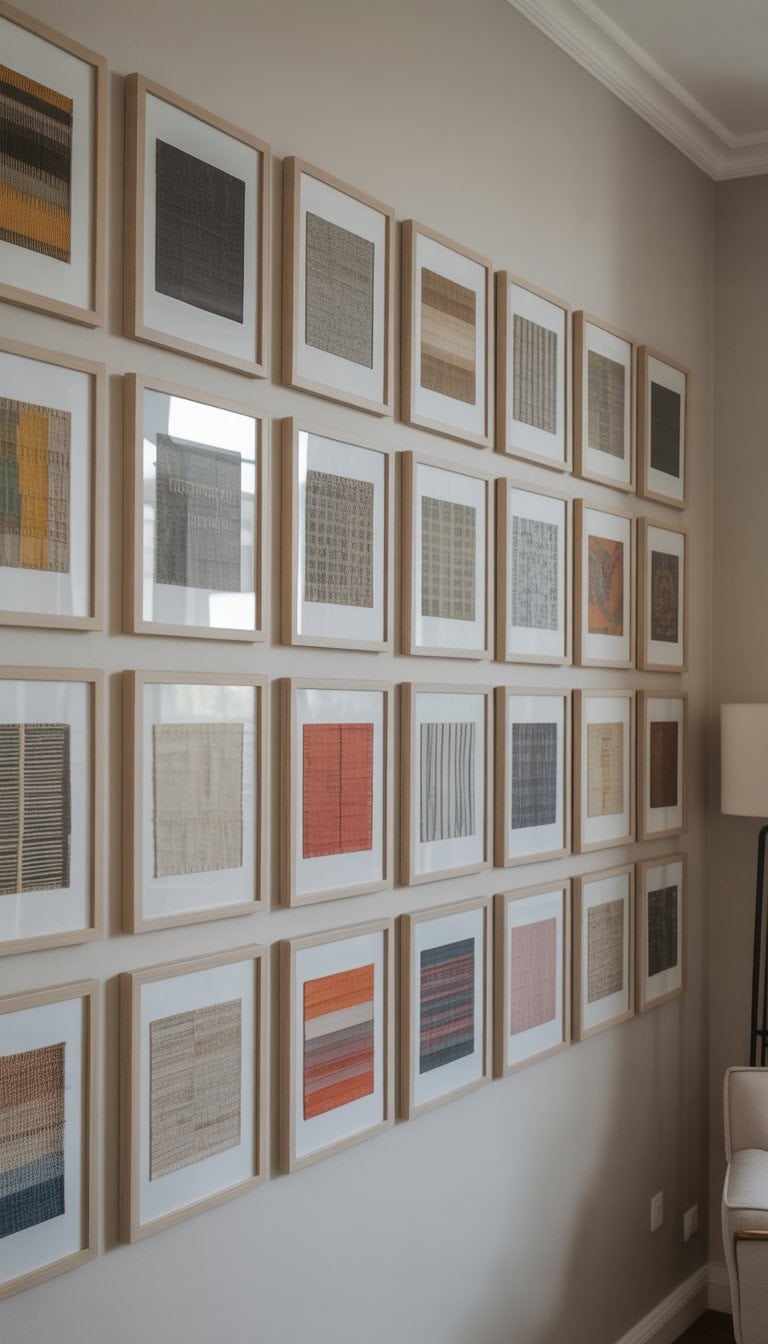
I like to add fabric art or textile pieces to my gallery walls whenever I want more texture and warmth. Sometimes I’ll frame a favorite piece of patterned cloth, a swatch from an old shirt, or even a small tapestry.
Mixing fabric art with photos breaks up the wall and makes the whole gallery feel more lively. It works for both bright and neutral rooms.
I often use custom frames for a special touch, especially if the textile has meaning to me. Textiles can also bring in new colors and patterns that tie the room together.
If you want something unique, try layering small fabric art pieces alongside classic photos. It’s a simple way to make your wall even more personal.
Create a theme wall like black-and-white family portraits
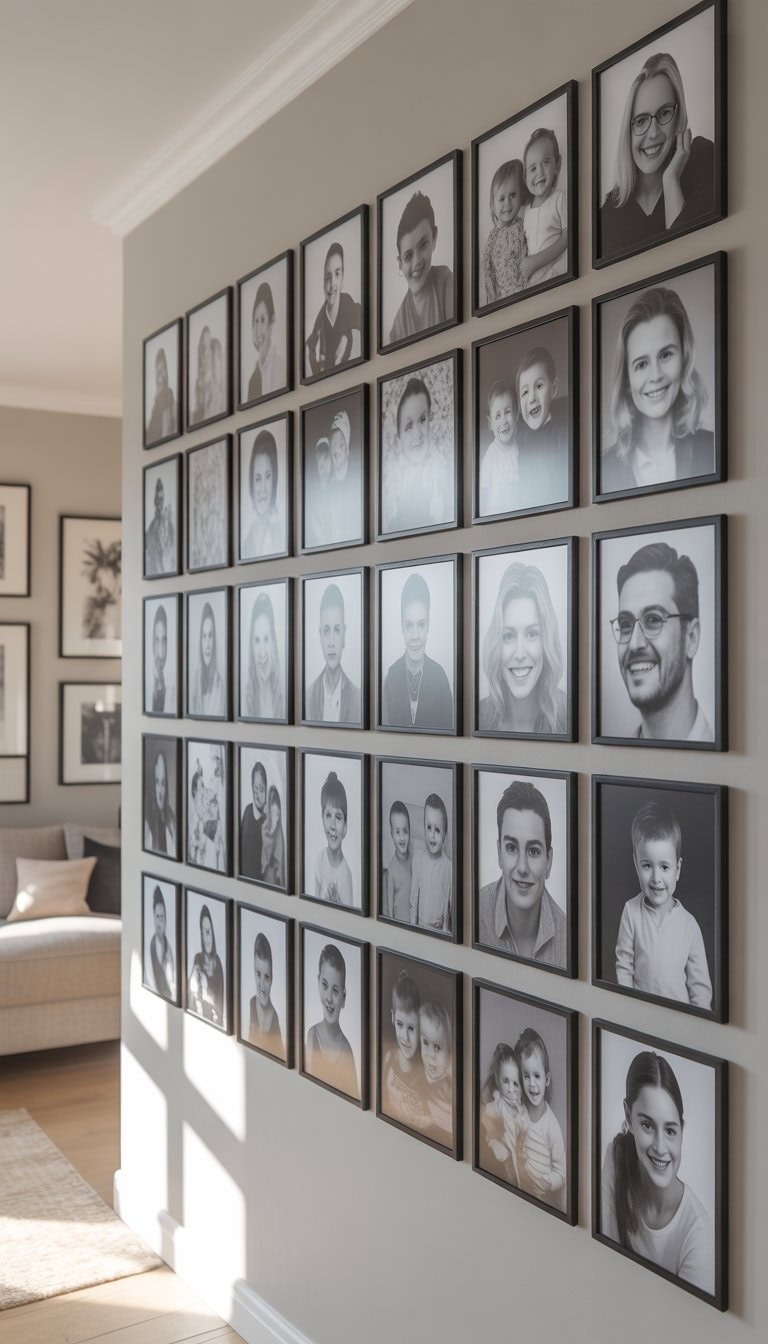
I love the simple and classic look of black-and-white family portraits. When I arrange these photos together, they instantly add a timeless style to my home. The lack of color draws attention to faces and details you might normally miss.
Choosing frames in the same color, like black or white, keeps the wall looking neat. Sometimes, I mix in a favorite quote or a piece of art, all in black-and-white, for extra interest. It helps the whole wall feel special and personal.
If you want inspiration or ideas for layouts, you can find creative examples of black-and-white family photo wall designs on Pinterest. I’ve found that even a small collection can make a big impact when every photo shares the same theme.
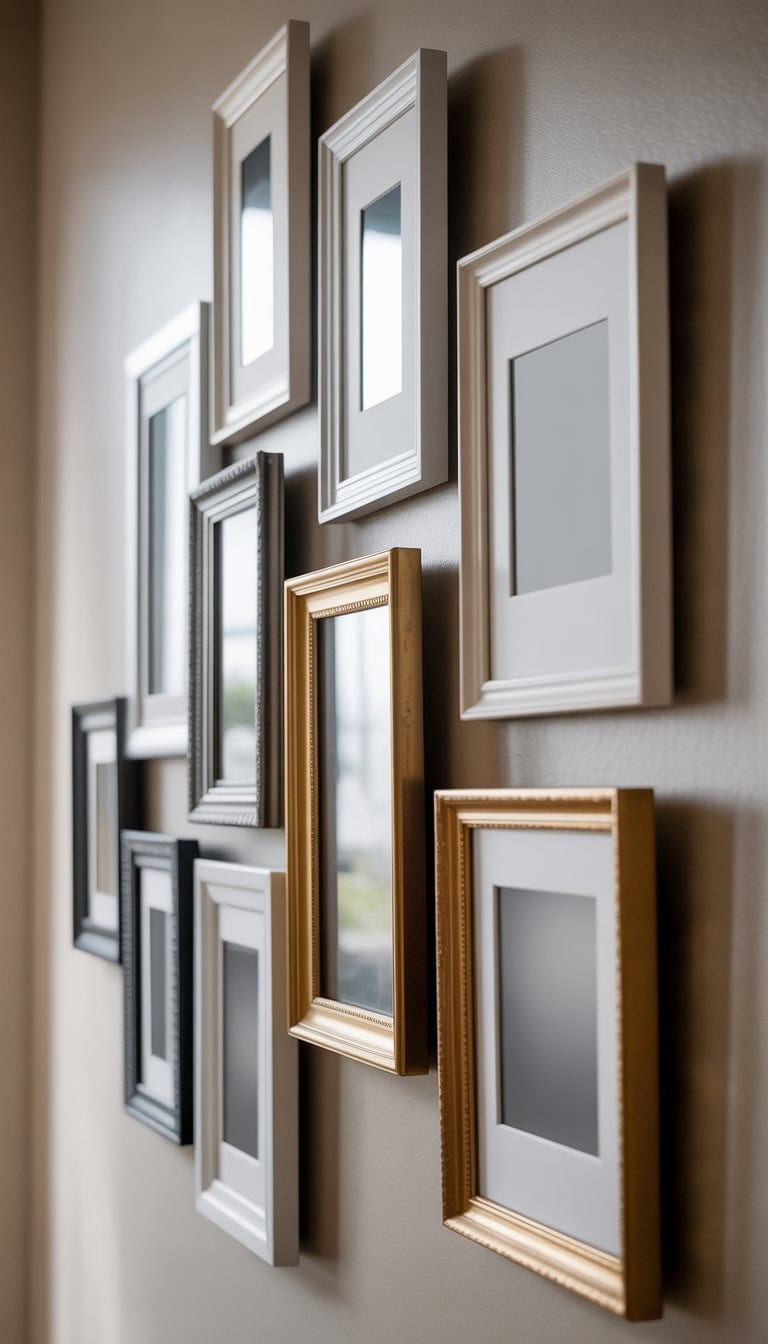
Incorporate mirrors among pictures for reflection and light
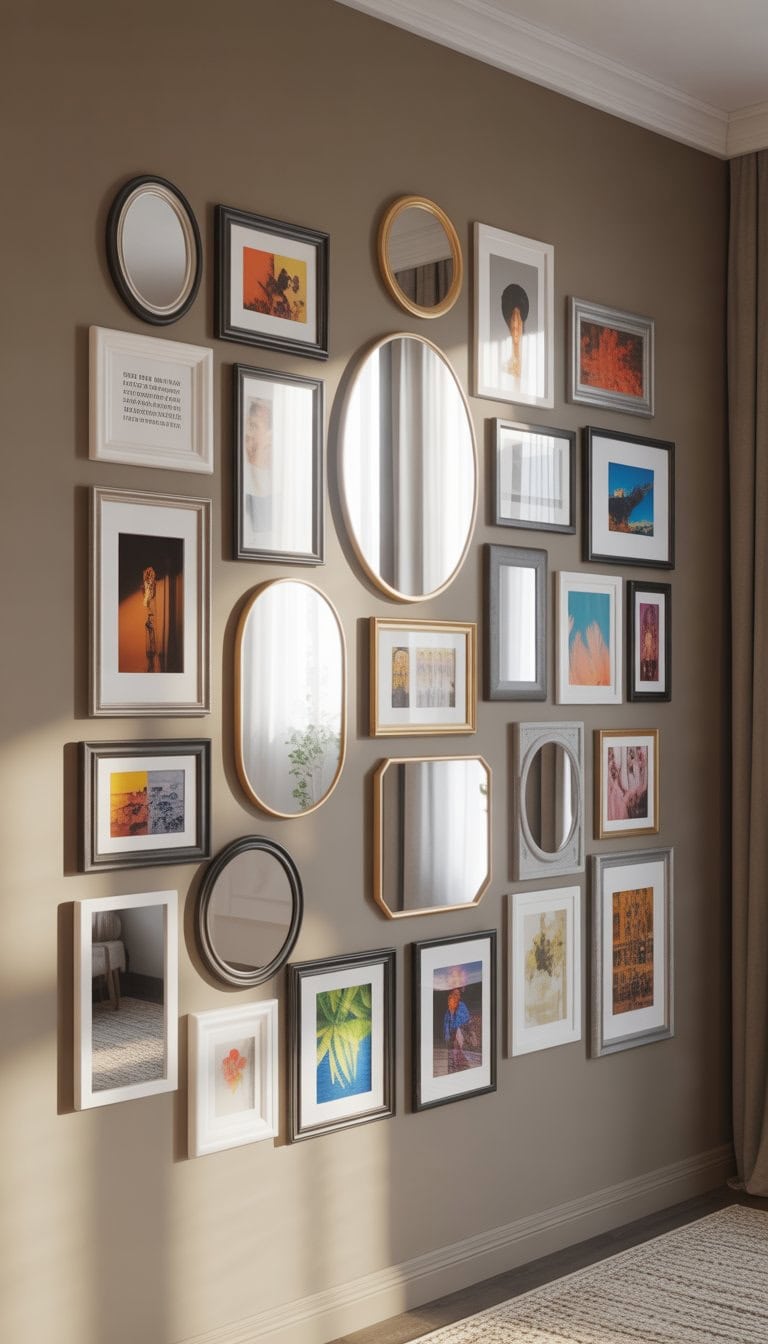
I love mixing mirrors with photos on my walls. When I add mirrors to a photo gallery, it gives the whole space a fresh feeling. The mirrors catch the light and make the room look brighter.
Sometimes I use round mirrors between frames to break up straight lines. It feels modern and interesting. I notice the room always feels a bit bigger, too, when a few mirrors are part of the display.
I try to match the frames of the mirrors and pictures, but I also enjoy mixing them for a more eclectic look. It adds character and feels personal. Adding mirrors to my photo wall has been a simple way to bring in more light and style.
Use a free online tool to plan frame placement virtually
When I try to arrange photos on my wall, it helps a lot to see how things will look before I start hammering nails. I use free online tools that let me upload a picture of my room.
With these tools, I can move frames around on the screen. I adjust the sizes, try different layouts, and even swap out art until I find a setup I love. One of my favorites is the gallery wall tool from mywalldecorator.com.
It’s easy and I don’t have to guess where to hang each picture. Planning virtually saves time and keeps my walls hole-free until I’m sure about my design.
Choosing the Perfect Wall for Your Photo Display
Picking the right wall for my photo display can make or break the look. I always think about how light fills the space and how the colors on my wall set the tone for the photos.
Assessing Lighting and Room Flow
Great lighting highlights my photo wall and makes it a true focal point. I look for a spot that gets plenty of natural daylight, but not so much that the sun will fade my photos. A wall near a window, but not in direct sunlight, often works best for me.
If the room is dim, I add picture lights or choose a wall that’s opposite a light source. Good artificial lighting can really bring out the colors and details in each photo.
I also pay attention to how people walk through the room. For example, I avoid tightly crowded hallways where folks might brush against the frames. Living rooms and stairwells are popular for gallery walls because they’re open and easy to see as people move by.
I make sure there’s enough open space for me to stand back and admire the whole display. The flow matters—I want my photo wall to feel inviting, not cluttered or squeezed into a busy corner.
Coordinating Wall Colors and Backgrounds
The color of my wall is like a backdrop for my photos. Light, neutral shades like soft gray, white, or cream make almost any picture pop. If I’m drawn to bold colors, I pick frames or mats that create contrast, so the photos don’t get lost.
Sometimes, I use a patterned wallpaper or a wooden accent wall for extra character. But I keep patterns simple, so they don’t distract from my photos.
I also match the frame style to my wall. Black frames on a white wall look modern, while wooden frames on a painted or natural wall give a cozy touch. Choosing a wall that fits my home’s theme helps the photos blend in and stand out at the same time. For more inspiration, I check ideas from family photo wall designs and see what backgrounds grab my attention.
Personalizing Your Photo Wall Arrangement
I love that a photo wall can be as unique as I am. By choosing different frames and adding creative touches, I can turn a gallery into something that feels truly personal and special.
Mixing Frame Styles and Sizes
When I set up my photo wall, I don’t stick with just one frame style or size. It’s amazing how mixing thick and thin frames, along with different materials like wood, metal, or even colored plastics, brings energy to the layout. This trick helps each photo stand out on its own, but still look good as a group.
I like to use both small and large frames. Placing bigger frames in the center or at the bottom anchors the display, while smaller ones can fill the gaps and add movement to the wall. To keep things from looking messy, I use a simple color palette for the frames or make sure the style fits the room.
Here’s a quick tip:
Try these combinations
| Frame Style | Shape | Placement Idea |
|---|---|---|
| White Mat Wood | Rectangular | Left side |
| Black Metal | Square | Center & right edge |
| Floating Glass | Any shape | Sprinkled throughout |
Changing up frame sizes and styles lets me tell my story in a way that feels lively and inviting. If I want more inspiration for creative layouts, I check out ideas from The Spruce.
Incorporating Art, Quotes, and Keepsakes
Adding more than just photos makes my wall feel meaningful. I like to mix in small pieces of art, handwritten notes, or printed quotes that inspire me. Including meaningful objects, such as ticket stubs, postcards, or fabric swatches, brings a piece of my life to the display.
I sometimes use shadow boxes for keepsakes that are three-dimensional. These let me show off souvenirs or even pressed flowers. If I want words on my wall, I’ll frame a favorite quote or write it on decorative paper to hang among the photos.
This mix of photos, art, and keepsakes turns a regular gallery into a visual story about my life. It keeps things interesting and gives everyone something to discover each time they look. For even more ways to add personal touches, I find inspiration in creative displays at sites like Good Housekeeping.
Frequently Asked Questions
Arranging a photo wall takes some planning and a little creativity. I like to mix personal favorites with modern touches for a space that truly feels like home.
How can I create a stunning family picture wall in my hallway?
For my hallway gallery, I start by choosing a consistent frame style or color. This helps tie all the photos together, even if the pictures are from different times or events.
Sometimes, I arrange the photos in a neat grid for a polished effect. Invitations and keepsakes mixed in add an extra layer of personality. For more tips about hallway ideas, I like to check collections like these gallery wall inspiration articles.
What are some creative DIY approaches to design a photo wall?
I love using floating shelves to switch out photos without damaging the walls. It’s so easy to move things around and try new looks.
A salon-style cluster, where I mix frames of different sizes and shapes, always catches the eye. Sometimes, I include postcards or kids’ drawings to make the wall unique. For more clever ideas, I get a lot of inspiration from DIY photo wall guides.
Could you suggest modern ways to display photos in my living room?
In my living room, a symmetrical grid layout looks fresh and stylish. Using black and white frames or matching mats keeps everything cohesive.
I also combine oil paintings with photography for visual depth. For more modern wall art arrangements, I love exploring art-focused sites.
Are there any tools or apps that can assist me with picture wall layout planning?
Planning tools save a lot of guesswork. I use free phone apps and websites that let me visualize the layout before I pick up a hammer.
They often have drag-and-drop features to experiment with shapes and sizes. Some apps also offer templates, so I can preview how different arrangements will look on my wall.
What’s the secret to perfectly arranging a large number of photos on a single wall?
When I want to display many photos, I stick with either symmetrical grids or organized clusters. Consistent frame size or color helps keep things looking intentional, not messy.
Leaving equal spaces between each frame is important. Sometimes, I lay everything out on the floor first before hanging them up to make sure the design works.
How should I decide on the placement of pictures for a balanced and eye-catching display?
I start by choosing a focal point—this might be a favorite family photo or a bold piece of art. Everything else spreads outward from there.
Mixing vertical and horizontal frames gives movement to the arrangement. I always step back between each step to make sure the balance feels right. Good lighting can highlight the best moments and details, too. For more visual ideas, I look through detailed art arrangement guides.
: Inspiration for Creating Your Dream Space")


